Showing posts with label 18thCentury. Show all posts

Sunday, October 23, 2016

Outlander American Duchess Simplicity 8161: TUTORIAL BODICE "B"


Hello Time Travelers!

I'm starting this working class bodice and stomacher commission soon for a client who wants me to reproduce the Outlander costume in the picture to the left.

I will be using the American Duchess Simplicity 8161 as a base, but will be making my own alterations, or "Hacks" as Lauren calls them, to make the pattern more historically accurate - But because my alterations to reproduce this look are rather extensive, I won't be including them here. I'll save it for ANOTHER tutorial for more intermediate sewists and costumers.  THIS tutorial is for the Novice or someone who is new to costuming, and new to historical fashion.

In addition to MY own alterations, I am including Lauren Stowell (American Duchess') "hacks" which are available in PDF form in a link. Once you become more familiar with some of the techniques you see here, you may wish to take up the challenge and REALLY take your historical accuracy further using Lauren's instructions.

Why am I writing this tutorial? Basically, for those who are new to costuming, and even newer to sewing. Some have expressed difficulty in following the Simplicity instructions. Since they stopped offering Home Economics, many of the upcoming generation of sewists are not familiar with many of the terms in the instructions. But, more so, they, like me, are visual learners. We learn by doing! I struggled in college with "book learning." How I maintained a 4.0 is beyond me. I had to work extra hard. I learn better by listening to lectures OR visual instruction. My auditory recall is excellent - which is why I excelled as a medical transcriptionist. I am severely left-brain challenged. No seriously! This is why I found learning to flat draft patterns using measurements ONLY very challenging. It took me a YEAR before the light bulb finally came on. Reading from books to me sounds like the teacher in Charlie Brown cartoons.... "Wah...Wah...Wah...Wah...Wah?" This is a challenge indicative to right-brained dominant people. So, I have offered to write this tutorial to assist those of you who need more visual instructions and less "technical" jargon to construct the Outlander pattern with some historical touches added here and there.

Now, if your goal is for a higher degree of historical accuracy, this tutorial won't accomplish that. What I am offering are some doable alterations that a novice can use to alter the pattern that will make your American Duchess Outlander costume a bit more passable. If you're looking for historical accuracy, I recommend J.P. Ryan or Larkin & Smith patterns. Some have expressed that they cannot afford these patterns; so if that's the case, then it IS possible to make alterations to the American Duchess Pattern, but it will take some rather extensive redrafts. This tutorial is a good stepping off place.

But before we start! . . . PLEASE do NOT cut your pattern out of your fabric yet! There are steps to take FIRST!  If you have already done so, well?. . . you won't' be able to make the alterations for historical accuracy. :( But you can keep reading, as there is valuable information you will glean.

By the way, please feel free to post any questions you may have in the comments and I will do my best to answer them as you follow along!

First - A little pep talk:

The most important thing to overcome when you start out is CONFIDENCE. Some may feel it is counter productive to learn via short cuts. I know that because I was taught by my grandmother who was an accomplished seamstress and a perfectionist, but a very gracious and positive teacher. I picked out more seams than I can count with her gentle admonition to "do it right the first time." However, not everyone wants to produce a completely historical garment. They just want to have a fan-girl moment and geek out with the rest of the Outlander enthusiasts. The historical accuracy and pattern drafting and construction techniques will come as your confidence grows! Pretty soon, you will be purchasing those expensive patterns as well as adding to your reference library.

So, for those of you who are here to learn - - PLEASE don't skip ahead to the construction section. I KNOW it's a lot of READING, but the information and the order in which we proceed is critical to your success.

So. . . let's begin by gathering the supplies you will need in addition to the fabrics and notions the pattern calls for.
MY ADDITIONAL SUPPLIES:

  • Swedish Tracing Paper 24" wide. (I buy it on Amazon)
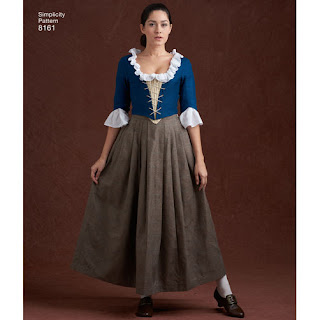
    American Duchess Simplicity 8161
  •  Ruler
  •  French Curve (See link below)
  •  #2 Pencils
  • Scissors (for paper)
  • Scotch Tape - Wrapping Tape
  • Plain Muslin (about 2 yards) for toile.
  • Measuring Tape
  • 2 yards 100% Cotton Stayflex Fusible Interlining*** (See link below)
  • 12 to 16 Grommets (1/4 inch)
  • 2-skeins of embroidery thread in matching color of your bodice.
  • Tapestry Needle (sharp pointed not blunted)
  • 4 yards Synthetic Whale Bone 10 cm wide, or 1 pkg of 125 Lb PSI Plastic cable ties 14" long (sold at Lowes).
  • 1 pkg 75 Lb PSI Plastic Cable Ties (You will use these on the stomacher as well)
  • Slide Ruler.
  • 18th Century Stays.
***I order Stayflex Fusible Interlining from the UK. It is the equivalent of fusible linen batiste, which sells here in the States for up to $20 a yard!!  Highway robbery! Macculloch & Wallis have been in business since the early 1900s. They are wonderful to work with.  The conversion rate to USD is about $4.00 a yard.

https://www.macculloch-wallis.co.uk/p/4671/fusible-woven-knitted/mw/general-purpose-fusible 

http://www.bblackandsons.com carries it for $7.50 a yard. But I purchase it in bulk from Macculloch & Wallis. The shipping isn't all that expensive and I actually save money. But if you don't have a couple of weeks to wait for shipping, then you might want to purchase it elsewhere, but it will cost more, especially when you factor in shipping on top of being $3.50 more a yard.

Why Stayflex?  Why not the polyester Pellon iron on stuff? In a word - - It's an inferior product. Because it's made of nylon polyester, it isn't as pliable. It's made of synthetic material rather than cotton or linen. It also doesn't fuse a well as Stayflex which has a low temperature adhesive. No, it's not historically accurate, but it's a better product. Stayflex gives your fabric needed support without making it look too stiff. Pellon products also give an "orange peel" effect to your fabrics (especially silks and cottons) that no amount of pressing will alleviate. I flat line each pattern piece with Stayflex before sewing my garments together. It is a wonderful stabilizer for fabrics that might stretch, like linen or wool, but it is useful for cotton chintz as well. 

What's a French Curve??? 

It's a tool that is used for pattern drafting; specifically curved lines, neck and armholes.

Purchase a Lance 9" French Curve $5.99 Here.


MY PLANNED ALTERATIONS TO THE PATTERN:
  • Elongate the bodice point in the front.
  • Joining Side Back piece to the Front piece for more historical accuracy.
  • Add a Small Peplum to the bottom of the bodice.
  • Optional: Add a Princess Seam to the bodice Front for a more contoured look.
  • Altering Shoulder Seam Placement for more historical accuracy.

LINK TO LAUREN'S (AMERICAN DUCHESS) PATTERN 'HACKS':

https://drive.google.com/file/d/0B5RoaVAG1geGYVEwSldqRnpQajQ/view


TRICK FOR DRAWING SEAM ALLOWANCES: 

  • Rubberband two #2 pencils together for a 1/2" seam allowance. 
  •  Rubberband three #2 pencils together for a 5/8" seam allowance 


PART ONE:

Taking Your Measurements:

PLEASE READ: It is very tempting in our excitement and enthusiasm to DIG into a project and start cutting out our pattern in our fashion fabric and ignore taking our measurements. We know our dress size, right? Unfortunately, this is not the way you judge your appropriate pattern size.

Any pattern, including Simplicity, McCalls, Butterick, etc., will not be an accurate dress size. In fact, dress sizes in retail clothing are all subjective. No fashion house has standard dress sizes. A size 12 in one line will be a 10 in another. You cannot go by a standard dress size, especially when sewing with commercial patterns!

Go by your measures! - Even if it means you will go up 4 or 5 dress sizes! I wear a 12/14 dress size but I had to cut my stays to a size 20! WHY?  Because the size 14 measurements were way too small, and the 20 was the closest to my actual measurements in THIS pattern. For instance, my professional dress form that is a size 16 is actually more accurate to a women's size 10 dress!! Now, with stays, you want to allow for a little reduction so you could possibly go down one size (if you're using the American Duchess pattern), but not with outer garments.

Many women nearly faint when I tell them the dress size I actually cut out for them. So, I usually just withhold that information. Up-sizing your dress size in a sewing pattern  means absolutely nothing about you! The clothing industry is WHACK! Don't let a silly NUMBER dash your self confidence! Chances are, you've invested in rather pricey fabrics, especially if you choose 100% wool, and you want your Outlander costume to fit properly and comfortably. So, please, IGNORE the dress size on pattern packages and use your actual measurements!  Be gracious to yourself!

NOW FOR YOUR MEASUREMENTS: 

First - - You will need to lace yourself into your 18th Century style stays. If you don't have your stays yet . . . Stop here and either purchase some; or if you plan to make your own, wait until you've finished your stays before you proceed. This will be absolutely necessary in order to ensure a proper fit of your bodice and petticoat, and avoid cutting the wrong size!

Client Commission
If you don't feel confident enough to attempt a pair of fully boned stays, you can custom order a pair on my Etsy page.

https://www.etsy.com/listing/484359705/18th-century-corset-stays-outlander?ref=shop_home_active_3

I offer payment options: A LAY AWAY with either a 40% deposit and the remainder due upon completion; or, four automatic monthly payments of $74.50, or 8 bimonthly payments of $37.25 via PayPal through my website: www.DesignsFromTime.com.

MY Current Stays W.I.P
If you are able to make your own stays, and have your 18th Century chemise or smock that you plan to wear, you will need both of these before taking your measurements.  

Please do NOT wear a bra when you put on your stays to take your measurements! It is best to take your measures wearing the exact stays and smock you plan to wear with your completed costume. If you do NOT have your smock made, but you DO have your stays, you can wear a thin camisole or thin, snug fitted tank top. It isn't going to be exact, but since this particular bodice (View B) does not close in front, you can get a way with some minimal variation.

Second - Don't lace your stays too tight! Lace them to what will be comfortable but snug and offers support, especially if you plan to wear them for more than an hour! They should not be so tightly laced that you can't breathe or movement is uncomfortable or painful.

PLEASE NOTE:  It is important that your stays are laced to the exact amount they were when you took your measures or the bodice may not fit properly when completed. So please avoid too much reduction.

Now, wearing your smock and stays laced up comfortably you will use your tape measure and record the following measures(see below).
  • Bust
  • Rib Cage (Under Bust)
  • Waist
  • Hips
  • Back length from the base of the neck to the waist.
These are your basic measures that you will need, as well as those provided on the pattern, to choose your appropriate pattern size to cut. Now if you find a two inch variation (smaller than your measurements) cut a larger size and make adjustments to your muslin toile.


PART TWO:

Pattern Alterations:

Using your basic measures wearing your stays you now know what size pattern to use. :)

Now, you will need to trace your pattern. You can make alterations on your original, but these will be permanent. I like to work with a tracing. That way, I save the original pattern for a base to make other styles. I also don't cut my patterns out by individual size so that all the sizes are intact for later use.

You will need a flat, hard surface to work on, i.e., dining table, or fold out table - Whatever area you have. Carpet is not recommended.

Now you will need the following supplies:
  • Swedish Tracing Paper
  • Straight Ruler
  • French Curve
  • Pencils
  • Scissors (For paper) 
  • Scotch Tape - Wrapping Tape 
  • Slide Ruler
Ready? Let's get started!!

Step One:

  • Lay your tracing paper flat on your work surface. 
  • Cut out a manageable width of paper to keep the roll from rolling off the table - or rolling back and getting in your way! 
  • Starting with the FRONT bodice piece (Pattern Piece #1), place it underneath the sheet of tracing paper. (My work table is black. I find a lighter color surface works better for tracing).
  • Pin the pattern to the tracing paper so that it does not slip. It's best if your pins are in the center, otherwise they can get in the way of your ruler and french curve.
  • Using your French Curve, ruler, and a single pencil, trace the front piece pattern all the way around (according to your size determined by your measurements) onto the tracing paper.


  • Mark all DOTS and diamonds (notches) on your traced pattern according to your size.


  • Now, unpin the front pattern piece underneath and remove it.
Step Two: 

  • Now, find your "SIDE BACK" (Pattern Piece #3). 
  • Slip it under the tracing paper and match it up to the Bodice Front, overlapping the side seams as you would if you were to sew these pieces together. 
  • Scoot it over to the right just enough to allow for regular seam allowance, approximately 3/8". If you don't take away the seam allowance here, your bodice will be that much too big. It may not seem like alot, but by the time you add 3/8 to 1/2 inch on each side you will notice it.
  • Now, transfer all the dots and diamonds (notches) from the original pattern to the traced Side- Back piece (#3) that you have now joined to pattern piece #1.  
 NOTE: Combining these two pieces now provides a more historically accurate pattern. Lauren's pattern alterations go a bit further - See the link. I am doing "minimal" alterations. It's not exactly 100% on point, but these changes will make your garment more passable. 

Now, if you are making View A of the American Duchess pattern, you will need to follow Lauren's Hacks to make the bodice fronts meet and to change the neckline. If you need help . . . just holler . . . and I can post a demo on my Facebook page: Historical Costumes by Designs From Time. This particular tutorial is for View B for the Lady Broch Tuarach costume.
  • I also traced my seam allowance on the side back (Below - Left Side) with blue pen, so it's not as visible. But you will need this as a reference in a bit.


  • I traced a seam allowance on the bodice waistline of the pattern so that it grows narrower near the side back/front side and front piece. I like it to be a little longer and 5/8" seam allowance, I find, is too much. The Simplicity pattern sits a bit too high for my taste. If you want a larger seam allowance, you can add it to the bodice pattern so that you don't lose that length.  


Step Three:

Now, we are going to lengthen the "point" on the front of the bodice.

  • Using your ruler, extend the front traced line (see the pink ink?) That's the line. You can see the original pattern underneath by the darker shading.


Picture #1
  • I've lengthened this line about 1 to 1-1/2 inches. 
You can make the bodice point longer, wider, and more squared for other bodice styles.
 (See the picture below for examples of other/later 18th Century styles). 

1785 to 1790s


1780s
NOTE: You can also alter the neck and front of the American Duchess Pattern to be more like the cream gown above. Those instructions are in the PDF handout.

Continuing on with the bodice point . . .
  •  Now using your French Curve, join the bottom curved edge to this extended line to elongate the point. See picture #2 below.
  • The second line underneath the first is for "seam allowance." See picture #2 below where the arrow is pointing. If you don't add some seam allowance here, when you make your seams your point will not be as noticeable. You WANT it to be more elongated to look more like Claire's bodice.
  • Check to make sure your line is drawn evenly. It looks like mine might have slipped a bit. I will need to redraw this BONING CHANNEL line and lacing holes. They are a little off here. See how the line for the boning channel at the bottom looks wider?  It should be even to the original point on the pattern. 


 Picture #2

Step Four


OPTIONAL PRINCESS SEAM:

Now - I'm going to offer you an OPTION.

If you want your bodice to fit exactly like the reference picture (See Right) you will need to make an alteration to the front of your bodice.

Basically, you'll be adding a "princess" seam.

If you do NOT add this alteration your bodice will fit more flat against your torso. If you want a more sculpted bodice, like Claire's, then make these change.

  •  Draw a curved seam in the front of the bodice as I have done in the picture below using your French Curve and ruler. (See Picture Below)
 (Insert Picture)
  • Now, cut the pattern out on that new line. You will need to either tape enough tracing paper to your original tracing to add your seam allowances, or retrace new pieces. This will give you an opportunity to clean up your paper pattern and make any notes or additional marks or sewing instructions. 
(Insert Picture)

Step Five:
  •  Now - Find your Back Piece (pattern piece #2).
  •  You will now need to trace your size as you did with the other pieces. Make sure you mark all your dots and diamonds (notches). 
  • Slip the Bodice Back piece under the tracing paper and match up your DOTS from the Back to the Side Back as you did before. 
  • When I matched the bottom piece to the side back it was longer. However, you will need to allow for "ease" here. What that means is that you must allow for the "curve" when sewing these two pieces together. When laid flat next to each other your pattern will appear longer. This is why I usually make a muslin toile (mock up) before I cut out my fashion fabrics. BE PATIENT. This step will save you from wasting fabric! 
  • If the back piece and side back pieces don't match after you sew your toile together, THEN you can adjust your pattern as shown below - or trim the excess.


Step Six:

Now we're going to draft the peplum! The narrow little "bodice" skirting piece.

  • Cut out your traced pattern, combining the new front Princess Seam, new Side front/Side back, and slip them under a fresh piece of tracing paper. You don't need a full sheet. I used some scraps to conserve paper. 
  • Take your Back Piece and match it up to the side back curved seams. Overlapping for SEAM ALLOWANCE - Reducing it just like if you had sewn the pieces together.
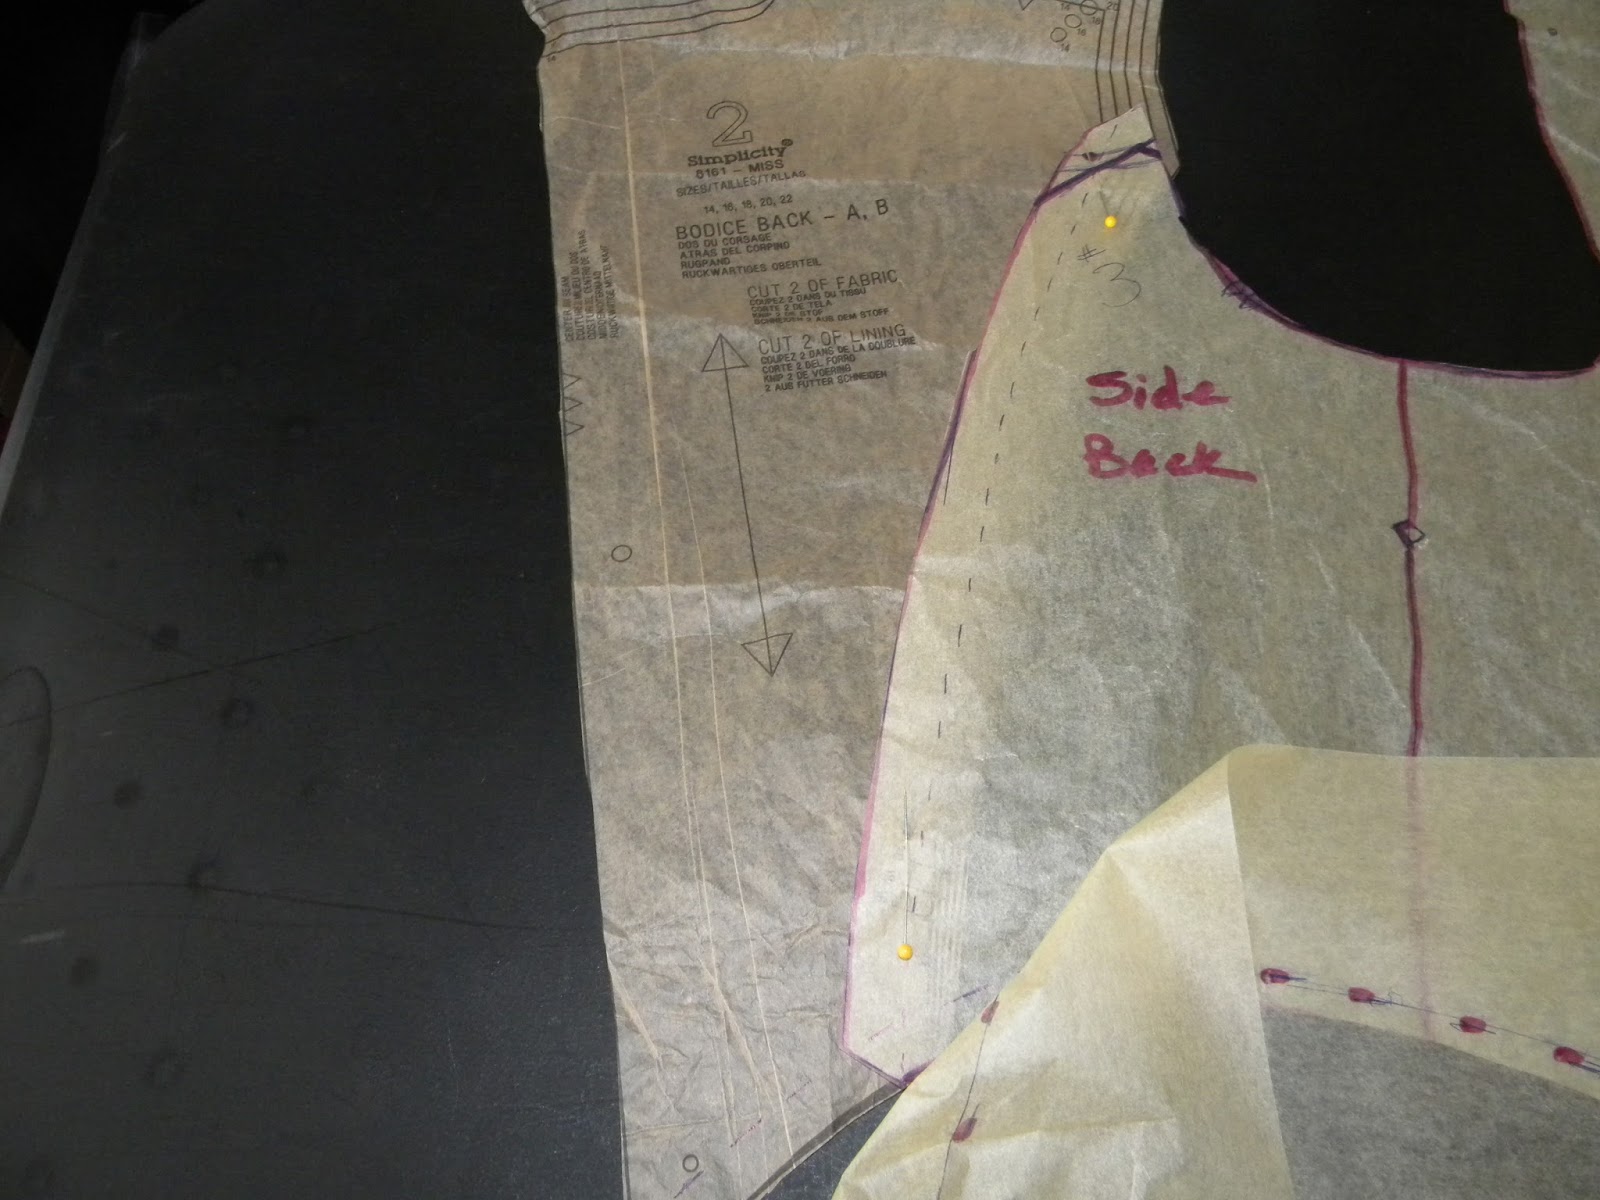

  •  Pin your pattern pieces together. (I forgot to trace the back piece! So I just used the original for example purposes). See picture above. I lined up the correct size and overlapped them to allow for seam allowances so that your peplum pattern will be drafted to the finished waist circumference.
  • Next, trace the seam allowance of all three pieces along the bottom edge (waist seam). See picture Below.
  • Trace the seam allowance where your Center Back Seams will be joined. See horizontal pink dots/slashes? 
  • Now extend your tracing of the bodice waist seam line along the bottom so that it meets the actual pattern edge underneath. See how it extends past the traced Center Back Seam Allowance? You can see the pattern beneath to judge where the actual edges stop. See picture Below.


  • Now connect these slashed lines (seam allowance for the bodice waist line) using your French Curve.
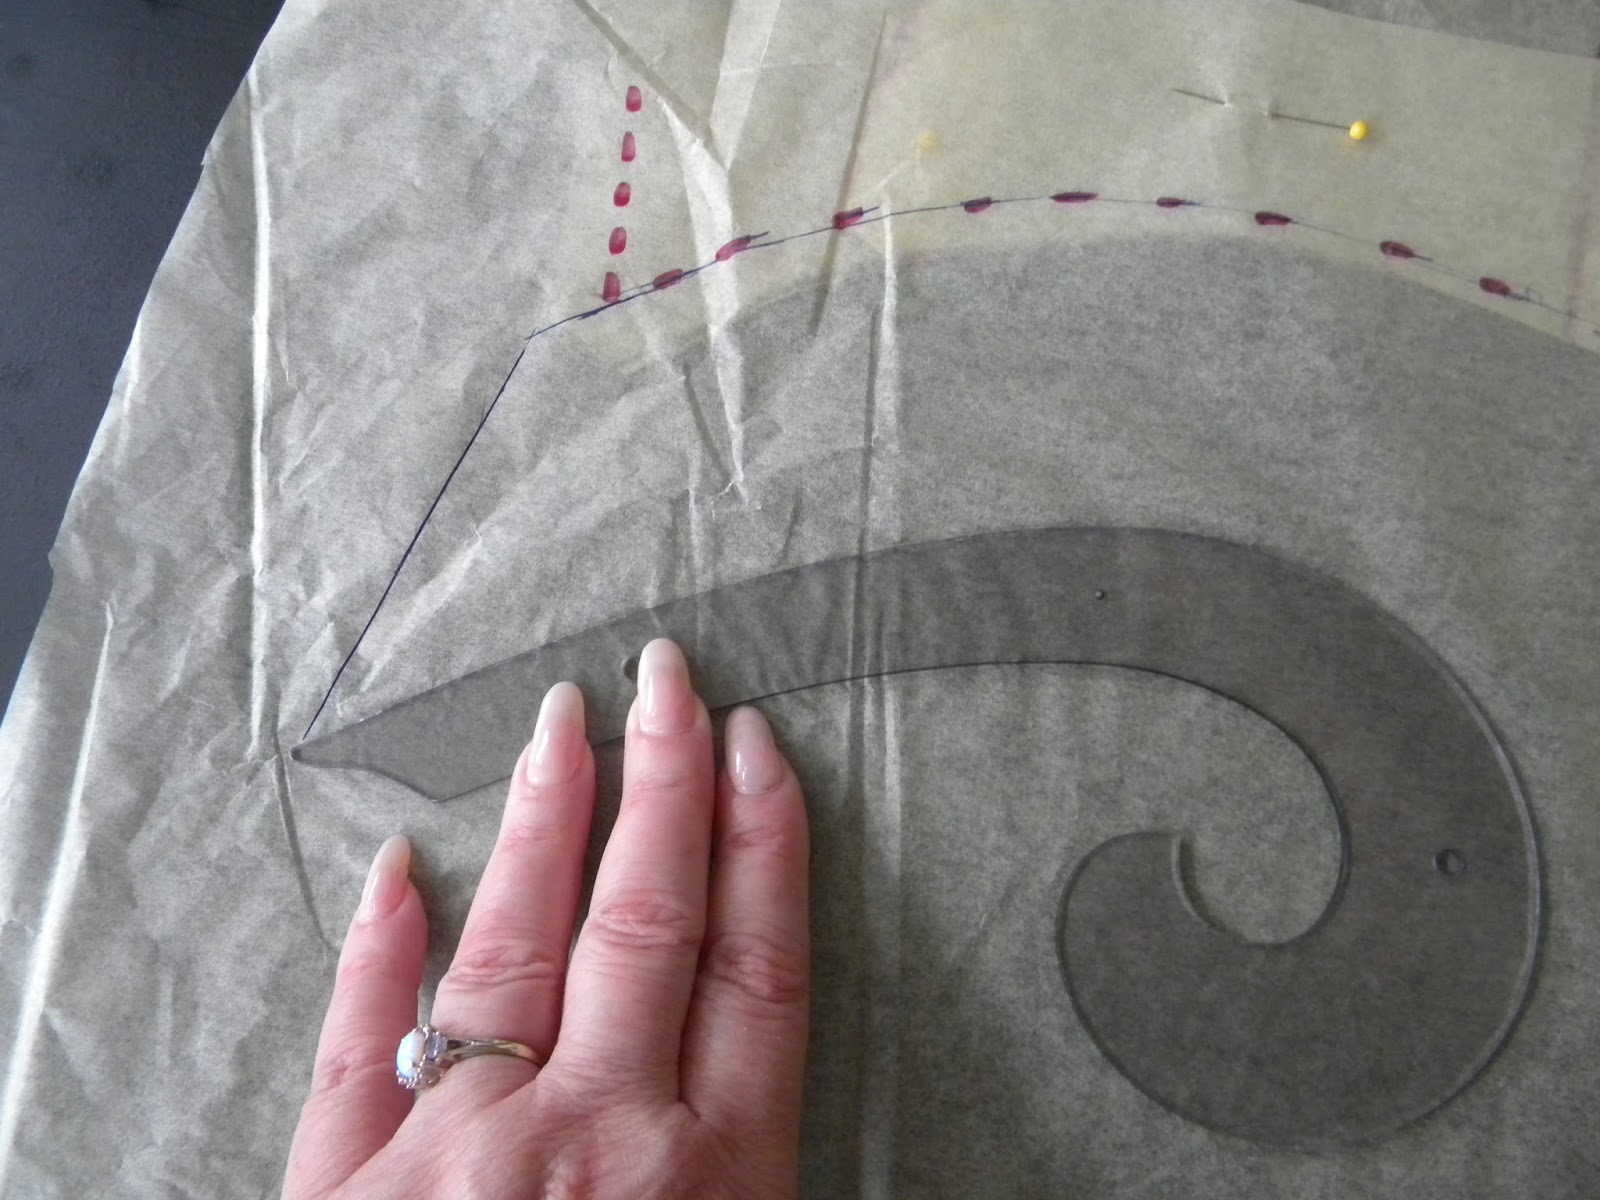


  • Next, extend a slanted line from where your waist line ends (matching the Center Back Edge). See how my blue pen line extends past the pink dots that I've marked horizontally (top to bottom) at the center back pieces? This is the edge of the true pattern underneath.  (See Picture Above). 
  • Now, using your French Curve, create the hem line of the peplum. It will curve, gradually narrowing as you extend it to the front piece. 
  • If you need more guidance for this curved line: Mark a dot at the end of your slanted line (approximately 3 to 4 inches).  Use a ruler and mark another dot 1 inch below the seam allowance about midway of the bodice. Now mark another about 1/2 inch below the seam allowance line near the bodice front about two inches from the LARGE dot near the grommet holes. Now, using your French Curve connect them. (See picture below for picture of finished pattern)
  • Don't take the peplum all the way to the front facing! The peplum sits back a little from the front point - As seen in the picture below.


You can make yours longer than 3" - My client wanted hers to be more subtle.

  • I have traced and cut the peplum pattern to the actual size it would appear if FINISHED.
  • Because we've linked the pattern pieces together as they would be when sewn together, taking away seam allowances, you do NOT need to add seam allowance to the center back of the peplum pattern. We've already drawn it to fit - taking into account the seam allowance for the center back, etc.
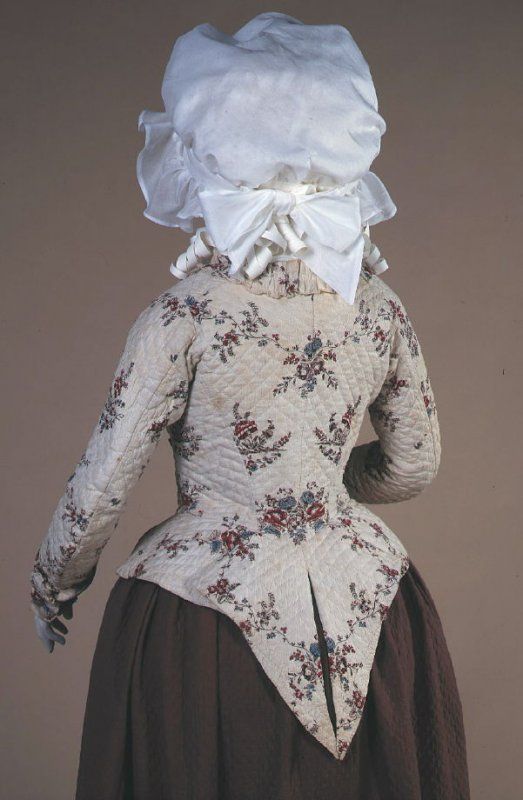
Swallowtail Caraco Jacket
NOW - You will need to decide here if you want the peplum to be two separate pieces so that it gives a mini "swallowtail"affect in the back (see picture to the right), or if you want it to be more rounded with both pieces joined in the middle with a little triangular "gussett" to achieve a a fuller or ruffled effect like the picture below.  Keep in mind, the swallowtail is much later than the time period Outlander is set.


Now in this picture (left) from Outlander the bodice doesn't really have a separate peplum sewn into the waistline; rather the bottom of the pattern pieces are "flared" so that when sewn together they creates a peplum. To do this would take some more extensive drafting, so I am just simplifying it for you by creating a separate little peplum.  

However, Lauren from American Duchess has given instructions in her PDF handout that shows how you can draft these flared shapes without having to sew a peplum into the waist. See her hacks for a Caraco Jacket without waist seams. The technique is pretty much the same as you would use to create this bodice, except the skirting of this bodice isn't long.

Here's the link to the American Duchess PDF handout once more: 


https://drive.google.com/file/d/0B5RoaVAG1geGYVEwSldqRnpQajQ/view


NOTE:  If this is just too much, I DO offer this bodice in my Etsy store with these more extensive pattern alterations to create a more authentic reproduction

Here are some more options for a peplum - Which are offered in the American Duchess Handout:


Peplum shown here in profile

 This is the stage where your muslin toile will be crucial!! Work out your final "shape" and pattern in muslin and make changes as needed. Trust me! You will save yourself a lot of grief if you work with a toile FIRST and perfect your pattern, making adjustments to fit your shape, etc. You can then mark your toile, pick the seams out and retrace your pattern using the muslin for an exact fit. You will then have a customized pattern that you can use in the future, knowing it will fit without a lot of alterations.
Even if you weren't going to make pattern alterations, making a toile for a pattern you've never used is a wise decision. Yes, it takes a bit more time, but it gives you the opportunity to make your mistakes on cheap muslin rather than your fashion fabrics which are costly.

Step Seven:

Continuing to Draft the Peplum:
  •  We need to add our seam allowance to the top and bottom of the peplum pattern. Using the trick I showed you in the beginning (rubberbanding two pencils together) draw your top and bottom seam allowance using your french curve as a guide.
  • If you have a dress form, you can pin your finished pattern pieces onto your dress form. This will allow you to see how the peplum will lay. If not, you can work out the peplum on your toile. 
  • The bodice pattern for Simplicity #8161 is peaked or pointed in the back. (See picture below) You may need to make some adjustments to the slant of your back peplum points if you choose a swallowtail. Once you've sewn your toile together (use basting stitches on the machine) you can trim these pieces so that they lay properly. 
  • If you DO trim your "swallowtails" you will need to retrace your pattern to 'ADD' your proper seam allowances once more. 
 
Simplicity 8161 Bodice Back View:  Pointed
Step Eight:

  • Now trace your sleeve pattern to the appropriate size. Taking care to make sure you've added the pleat marks, dots, seam allowances, etc., and cut out your paper pattern.

NOW - Before we continue. . . I am going to go over one of Lauren Stowell's (American Duchess') pattern hacks available in her PDF handout.  You can either use the simplified version that we've already drafted, or you can take your pattern alterations a bit further to make it appear more historically accurate. It's YOUR choice. I've written this tutorial for those who are newer to costuming and haven't done much pattern alterations or drafting. So those of you who are more accomplished, please keep that in mind. This is my attempt to break down these alterations to bare bones and make it basic enough that a novice can experience a feeling of accomplishment, and perhaps go on to study draping and pattern drafting like I DID!

Altering The Shoulder Seam Placement.

  •  FIRST: Before you go any further, pin your back piece and your combined front/side back-side fronts pattern together at the shoulder seam
  • Now, lace yourself into your stays and gently, without tearing your pattern paper, smooth it down against your torso to check where it will fall at your waistline.
  • You will get a better idea how it fits with your muslin toile, so you can SKIP THIS if you wish to work any fit issues out in your muslin toile. But if you find your paper pattern or muslin toile rides up too high (especially if you're longer waisted) you will need to make alterations to your pattern to lengthen either the waist length of all pattern pieces, or your shoulder straps. I usually start with the shoulder seams as it's the simplest fix. 
  • However, if  after lengthening the shoulder strap a little and the bodice is still too short you will need to alter the waist or torso length on your pattern pieces. You cannot just cut it longer at the bottom, you have to find the waistline on the pattern and elongate it by cutting the pattern piece in half, then add length by inserting a strip of paper and taping the pieces back together. You will need to make sure all your pattern pieces line up evenly after making any additions to the waist length.
  • Before you make such drastic alterations, try adding a little length to the shoulder strap. It will be easier to just take away that little length than to alter ALL of your pattern pieces. (See Picture Below
 (Insert picture - How to lengthen Shoulder Straps)

  • Adding length to the straps will affect the size of the armhole (or armscye). So if you lengthen your straps you will need to alter the sleeve pattern width as well - adding the same amount to the pattern as you did to the shoulder. So if you added a 1/2 inch of length to the straps, you will need to add that same amount to the sleeve width; otherwise, the sleeve will be too small to inset it them into your bodice's armholes. 
  • Rather than to just add width on the seam allowances of your sleeves, you need to split it straight down the middle lengthwise and widen it by spreading it apart to the same measure you added to your shoulder straps. 
  • If the sleeves are too loose around your upper arm after adding width, you can always adjust the fit in your muslin toile then redraw your pattern from your muslin toile.
(Insert Picture - How to widen Sleeve Pattern)

  • Now check the fit once more on the bodice with the altered shoulder straps. If it solves the issue, GREAT! We can move on. 
  • Now that you've checked the fit for your overall bodice and shoulder straps pattern, lay your back piece and your combined front/side-backside to the new Front patterns flat on the table and overlap them at the shoulder seams to take away your seam allowance on the princess seams. Now over lap the seam allowance of the shoulder seams.  Now tape  shoulder seams together with scotch tape.
  •  Next, you will REDRAW the shoulder seam with your ruler as shown in the picture below.  

(Insert Picture - Redrawn Shoulder Seams)

  • Next - add seam allowance to the new shoulder seam placement on both pattern pieces. T
Now . . . back to our Peplum:
  • We added seam allowances to the peplum pattern we drafted.
 (Insert Photo)
  • Next, cut out the peplum in muslin (Cut 2).
  • Fold your seam allowances over at the center back seams (slants) of the peplum as seen in the photo below. I pressed them over so that they would stay.
    (Insert Photo)
  • Now, lay them on the table with the left and right pieces facing each other as seen in the photo - with your  "swallowtails" meeting at the center as they would if finished or sewn into your bodice waistseam.
 (Insert Photo)

  • Lay a sheet of tracing paper over your left and right muslin pieces (peplum). 
  • Next, use your french curve and trace a curved line at the bottom of the triangle or gap - joining them.  
(Insert Photo)

  •  Now, trace your seam lines (where you've folded the muslin over) and trace the triangle at the sides joining them at the top most point.  (See Photo)
(Insert Photo)

  • Now, remove the muslin pieces and widen the bottom of your triangle. This will allow a bit of fullness and add a little ruffled affect. (See picture) 
(Insert Photo)
  • Cut out your paper 'gussett' (triangle) and pin it to your peplum pieces.Make sure your edges meet on both sides. If not, true up your lines.
  • If you like the shape, then cut it out of muslin, and proceed to Step Nine
  • If you want to make a longer "skirting" than the peplum we've drawn, then follow the "Handout" I've linked you to for American Duchess.

Step Nine: 

Since you have lengthened the front of the bodice, you will also need to lengthen the stomacher.

  • Fold the stomacher pattern in half. 
  • Now match up the bottom seam allowance to your newly drawn bodice front. The stomacher will sit just below the point of your bodice.(See the picture at the beginning of this blog post for reference).
  • Lengthen the top of the stomacher so that it sits where the dots have been traced.

PART THREE:

Fitting Your Muslin Toile:

  • Now, cut out your pattern in muslin and stitch up all side seams and your shoulder seams, and sew in your sleeves, AND your peplum. 
IF YOU NEED HELP WITH CONSTRUCTION TIPS - SKIP DOWN TO "Part Four" OF THE TUTORIAL - AND SEW YOUR MUSLIN PIECES TOGETHER
  • Now, Lace yourself into your stays and try on your muslin toil inside out so that the seams are facing outward. This will allow you to make tucks and minor adjustments to side seams etc. That will be particularly necessary if you have made your front bodice edges to meet in front.
  • Tug the toile up around you so that it sits properly and pin it in place to your stays.
  • Check your shoulder seams to make sure your armholes aren't too tight or too loose. 
  • REMEMBER: This particular bodice will NOT meet in the front! There will be a gap where it will be laced and your stomacher will show through.

PART FOUR -  Bodice "B" Construction:

Step One: 

  • With your new and altered pattern pieces traced out on paper once more, including any fit or alterations you found necessary in the muslin toile, lay out your bodice pieces on your fashion fabric. Follow the arrows to cut on the proper fabric grain.
  • FOR BETTER FIT:  Lay your lining fabric underneath your fashion fabric and pin pattern pieces to all four layers. Cut out each pattern piece this way. This will ensure exact matches for each pattern piece. You will need VERY sharp sewing scissors that have not been used on paper - Just fabric.
  • Cut out two sets of Stayflex cotton fusible interlining for each pattern piece - one for your lining and for for your fashion fabrics. You will be using it to flat line both your fashion fabric AND your lining pieces. 
  • Carefully match up each interlining and with its corresponding pattern piece. If your fabric doesn't have an obvious RIGHT side, make sure your pieces are laid out properly so that you don't fuse your interlining to the wrong sides. With your iron, fuse each interlining piece to its corresponding fabric pattern piece.  
  •  Now, carefully trim any excess edges of the Stayflex. This is IMPORTANT for accurate seams. 
 Step Two: 

  • Stay stitch about 1/2" to 1/4" along the edge of the back pieces at the neckline of your fashion fabric, as well we the front neckline pieces. (As shown below)


  • For more accurate seams, take your pencil and your ruler and your french curve and turn your pieces to the wrong sides - the sides where you've fused the interlining. If you use a ballpoint pen, make sure and test it on a scrap of fabric to make sure the ink won't bleed through to the right side of your fabric. 
  • Now, take a slide ruler and measure out either 1/2" or 5/8" seam allowance. Mark the seam allowance at the bottom, middle, and top of each pattern piece seams - both the fashion fabric and your lining pieces
  • Now, using either your straight ruler and/or your french curve, connect these dots and carefully MARK your seam allowances. You only need to mark ONE side rather than both sides. 
  Step Three:
  • When you are ready to sew your pieces together, if you've taken care and marked your seams neatly and accurately, you can use these lines as your stitching guide on the machine. This is especially helpful for novices who don't quite feel confident in sewing a straight seam line.  Go slow and relax. Keeping your needle on that drawn line. If you want to practice first, draw some lines on scraps of fabric and practice keeping your needle straight. Try not to tense up. If you do your seams will turn out crooked.
  • Now find your Back pieces in both your fashion fabric and your lining pieces. It saves time if you sew both your lining and your fashion fabric pieces at the same time, rather than sewing up the bodice and then having to start from scratch with the lining.  
  • If you want to be really efficient, you can feed each piece one right after another under the feed dog, following your stitching guide, and making a chain of your pieces. When you're done, trim your threads. This way, all your pieces will be sewn at the same time and with the same seam allowances.
  • With RIGHT sides of the fabric facing each other, pin your fabrics with the pin heads laying horizontal. Don't sew over our pins if you can help it. It bends them, and can also break your sewing machine needle. 
  • Now stitch the center back seams together and press the seams open with your iron. To save time, you can wait and press all your seams open at the same time. 
  • Now, follow suit by pinning your curved edges of your side-back/front-side piece to your back pieces. Start at the bottom and work your way to the top; easing the curves together. 
  • Now follow your seam allowance guide and sew these pieces together.  
  • Now, move on to the front piece (if you redrafted a princess seam in the front).  
  • Clip your curved seams and press open on both your fashion (outer) fabric and the lining. 
  • Now, matching the pieces with the right sides together, start at the bottom front and stitch up the front facings, around the neckline, neck, and stop at the bottom of the front facing on the opposite side: 
  •  Next, make a stitch line about two inches long along the bottom edge of the front piece. Remember the peplum will sit back a bit from the point, so you want to finish this small area by stitching it, then turning. However, where the LARGE DOT is located, leave a small space open. This is where you will insert your boning for your lacing bars. 
  • Clip your curved seams, turn right side out and press with your steam iron. 
  •  Now, mark your boning channel with your pencil on the inside of your lining. I take a piece of boning and draw a line the same width, then make it just a little bit bigger to allow room for the boning to slip easily into the channel once it is created. 
  • Now, starting at the bottom, make a tack with your backstitch, then follow the traced stitch line you drew inside the lining. Staystitch it at the top as well with a tack, making a back stitch 
  • Now, measure the length of your synthetic whale bone, cable ties, or a light weight metal stay. 
  • If using plastic, cut your length with wire cutters or heavy duty scissors. Make your top slanted a bit to better fit in the slanted shape of the bone channel. 
  • Wrap the ends in a small piece of duct tape to smooth out your sharp corners. 
  • Now, slide the stay from the bottom until it meets the top.  
  •  Close the "hole" where you inserted the casing with a needle and thread. Take very SMALL, neat stitches so that it is not visible. 
Step Four

Now we will sew the peplum pieces together and then attach it to the waist of the bodice, and hand stitch the lining closed.


Step Five

Next, we will sew our sleeve pieces together and line them, then install them into the armholes.


Step Six: 

Grommets Installation & Couching them with embroidery thread.


Step Seven: 

Stomacher.


PART FIVE:  

The next thing I wanted to include is the skirt or petticoat.

The Simplicity pattern calls for only three panels, but for a fuller more accurately pleated skirt you need 4 to 5 panels.

Another addition I like to make are facings to the pocket holes so that there isn't a gap that shows your smock underneath.  The pattern just calls for "slits". The instructions in the pattern that Simplicity wrote are just not what I find to an optimum technique. My technique may not be historically accurate, but it is a much better alternative. 


Thursday, October 20, 2016

18TH CENTURY: Prints & Color Combinations

I've been binging Outlander whilst making 18th Century stays and talking to several long-standing costumers on the 18th Century Sewing page on Facebook (who are knowledgeable in this period). Most of my acumen has been the 16th Century and Victorian, so dipping my creative brush into the 18th Century has been an exciting endeavor, as it is actually my favorite era, aside from bustle dresses! *swoon*

One of the things I recently learned, as I am planning my OWN 18th Century ensemble - A caraco a la Pierrot and petticoat styled like the picture to the left - is that prints were pricey and more than likely not available to the poorer or working classes. But unlike the 16th Century where the most expensive fabrics were often reserved for sleeves and foreparts and worn under the over skirt, for the 18th Century these pricey chintz prints were worn predominantly as outer garments rather than petticoats and such.  Good thing I learned that, because I was mulling over making a print petticoat to go with a solid bodice/jacket!  

Since the the first season of Outlander, the working class worn by Clair when she first arrived in 1743 Scotland, have become popular. Of course, wool - especially authentic Scottish tartan - is very expensive and can run upwards to $70 or $90 a yard/meter!  Crikey! I did find a nice Donegal tweed for $35 a yard, and I am using it for a client's "Lady Broch Turach" ensemble in the coming weeks. 
If you're concerned with historical accuracy, and your character is part of the working class, you can never go wrong with Linen! 

But if you're wanting something for the upper middling/merchant or upper class, a polished cotton chintz is a more affordable option as silk brocades will be much more expensive. 

SAMPLE OF 18TH CENTURY PRINTS: 

The following examples of print motifs will assist those who wish their fabric to be as Historically Accurate as possible in 21st Century fabrics. Examine the type of prints for each decade and you can find something similar. 

1790s Caraco a la Pierrot


A nice quality polished cotton chintz can run about $20 + a yard, so those who might not be able to afford 10 to 12 yards, can pair a print Caraco or a Pierrot jacket with a linen or lightweight wool in a solid color.


Quilted petticoats were also in vogue.  This is a bustled 18th Century Polanaise gown worn over a quilted petticoat, but they were also worn with Caraco Jackets. The caraco and the Pierrot jacket (Pierrot Jackets were predominantly popular 1785 to 1790s) were worn by all different classes.


In the 1770s, Dutch Fashion finds the use of mixed prints in vogue. They would mix up to three different prints for the jacket, petticoat, and apron.


While you can find this trend in other countries, it was more prevalent in Holland, as that was where many of these cotton chintz prints were produced. 


COLOR MATCHING: 

One of the questions I faced whilst planning my ensemble was color palate. As a designer, I'm accustomed to using a color wheel to pair up different colors, rather than using the main color in your fabric and "matching" it with a solid skirt in that same hue. Instead of "matchy-matchy" stretch a little out of your comfort zone and get creative!  Pull a secondary color out of your fabric and use that instead. 


Here are some color combinations to play with! 


I found this trapunto (Italian for quilted) fabric at JoAnns Fabrics in the home decor section. It makes a great quilted petticoat. 

I also have this rustic cotton weave. I love it. Pink is one of my long standing favorites, second only to purple. 

 My plan is to make a Caraco jacket out of the pink and cream fabric, but what color do I make the linen skirt? - - I decided on a light aqua blue: 

https://www.fabric.com/buy/0403740/kaufman-essex-linen-blend-willow


I purchased this gorgeous chintz on Ebay (below). I snagged the last two yards, but it is 54 inches wide so that is more than enough for the swallow-tail Pierrot I plan to make.  The color most might be tempted to pick would be lilac, but the pale aqua blue above is the color I'm choosing. That way, I can mix and match it with the pink and ivory jacket, as well as pair the chintz with the ivory quilted cream petticoat.


Have fun with your fabric and color choices. Pair Stripes with floral prints!  A striped petticoat with a floral chintz is a nice look. But don't be afraid of color!  Bright colors were common during this time period. 

Example:  Pair a red and white print with a bright apple green! 

There are plenty of ideas to draw from on Pinterest. 


Wednesday, April 20, 2016

CHOOSING YOUR DESIGNER: When is a bargain NOT a bargain?


When what you paid for is substandard it's not a bargain.

Juliet Jacoby, a 17-year-old from Colorado, found the prom dress of her dreams for $149 (£104). But deciding it was a little pricey, her mother found what she thought was the same style costing only $35 (£24) from another website. What she got was NOT what she bargained for! This is an all too familiar story that I see in the world of costuming, too! I hear the horror stories constantly!

Peruse Etsy or Ebay, and especially Facebook, or sites like "AliExpress" and you will find plenty of "under" priced costumes, bridal, evening, or fantasy gowns. They all sell for much less than what the fabric alone would cost. When you see those listings this needs to be a RED FLAG! A sign for you to walk away!

Whether it's for a historical reproduction, a prom dress, bridal gown, or a cosplay costume, a quality silk ranges in price from $15 to $30 a yard. The fabric in the original gown as shown in the article is silk taffeta. Retail, a silk taffeta will be priced on the high end of that scale. Wholesale you're looking at perhaps half that. A gown such as the one represented in the article would take no less than 10 yards. Do the math. 10 x $15 = $150, if the fabric is purchased at wholesale cost. If it's not purchased wholesale then the cost of fabric would be $300. That's just for the main fabric! That doesn't include the lace, the silk chiffon for the sleeves, the notions, the lining, and the under structure (corset) that needs to be built into the bodice to produce the gown she thought she was purchasing. There is NO WAY a consumer can expect a quality made gown for $35. In fact, there is no way to produce that red gown for the $149 price! The corset alone built into that gown would cost no less than $300 in labor and supplies.

Unfortunately, there are more substandard options being sold on the internet than there are quality, including Etsy and certainly on Ebay and Facebook. Facebook is a great way to follow a specific designer's work, but these fast fashion sites like AliExpress and others don't allow you to interact with the designer, but the same applies for many vendors on Etsy. For example: I saw a listing on Etsy for a reproduction of the green coat worn by Richard Madden in "Cinderella" being sold on Etsy for $99 from a vendor in China! They showed a garment in the listing that looked like a half decent reproduction, but they have no real online presence for a customer to follow them to SEE their garment in the stages of production. Yes, fabric is cheap in China, but I PROMISE you when that garment arrives it will look nothing like the sample picture they used! I PROMISE YOU!

This bait and hook tactic is being used by disreputable vendors to lure "bargain" shoppers with pictures of beautiful garments priced dirt cheap. But let me educate you on one point: quality fabrics - even those purchased in China - will cost more than the overall price tag of $99 for the finished product, and so will the labor! Chances are if you purchase such an item you are supporting a sweat shop who pays their workers pennies a day and rather than getting "this" (see picture on the right above, you get THIS (See picture below left). They are selling this so-called "costume" from a vendor in China on AliExpress for $118. This same coat is listed in MY store for $518 just for the labor! Why?  Because the labor to create an authentic, quality tailored 18th Century men's tailcoat takes WEEKS to construct and you need to know how to tailor - unless you want something that resembles a pair of pajamas as you see in the picture below.

This is the reality (pictured left). This is the quality you will receive for $100. Friends, there are "designers" from China, Taiwan, India, Korea and some of the eastern block countries (and yes, even here in the USA) who are offering inexpensive costumes or gowns, but IS it really a bargain if what you're purchasing is substandard fabric and craftsmanship? Don't be lured by cheap prices!

Before I continue, I want to make it clear that I have nothing whatsoever against the cultures of the countries I referenced. I'm basing my comments solely on my research of listings I have found online, and on Etsy, Ebay, and Facebook, and feedback from consumers who've been burned, in addition to my own 30 years of experience as a seamstress and 15 years experience in historical costume design.

When you choose a designer or a garment based on a bargain price you WILL NOT receive a true bargain. A bargain isn't a bargain if what you purchase isn't the same quality that you would see if you hired a reputable designer whose work you can personally vouch for.

Let me give you another example to help you understand how these companies cheat you.

This gown to the right was featured on a scam alert page on Facebook. The retailer was "Rosewholesale." The original gown was made of Guipure lace. Guipure lace retails for $130 to $250 PER YARD! A gown like this will also have an underdress sewn into it. There is likely to be some lightweight boning in the bodice. You can see there is a HUGE difference between what was ordered and what was received, and this is an all-too-common story. They use pictures of beautiful gowns to lure you into a sale, and then send you something that looks like the dress "received" in the picture to the right. If you want quality, you need to be prepared to invest in it. There are NO short cuts or bargains for quality fabrics and more especially for talent and construction.

Look, I'm NOT about the hard sell, and don't make it a habit to tear down anyone's choices, but I truly CARE about my clients - and all of you who follow my work - so when two fellow reenactors recently posted pictures of an Italian Renaissance gown (Eleonora of Toledo) they were considering that was being sold by a vendor on Etsy from Kiev, Ukraine, I couldn't keep silent! As a professional I could immediately see the construction issues in the sample. I could tell at a glance that it did not have the appropriate supportive inner structure sewn in to the doublet lining necessary to hold up the infamous medici collar.  Even though the photography was very professional and the model was beautiful, I could see what the layman's eyes could not.

I completely understand that my schedule is busy and sometimes clients, or prospective clients, can't wait for an opening. Often times it is a case of the "Id" in our psyche being too strong to delay instant gratification rather than wait and plan a gown and make payments on it (which I offer). I don't expect my clients to ONLY hire me for their historical clothing or costuming needs. So rather than criticize their choice, I instead attempted to give them some suggestions for them to pass along to the seamstress to add to the inner structure of the bodice so that what they were purchasing wasn't two pieces of fabric slapped together with decorative trims and labeled "Italian Renaissance Costume. The problem is that most people don't speak the same language as a designer. For that matter, some designers don't have the same experience or knowledge about construction tips. There is a difference in someone on Etsy who makes historical costumes as a "side job" and those who have actually studied fashion design and historical clothing construction. I'm not ashamed to say that I am in a constant state of learning! Where my designs stand out is in the lengths I take to produce actual "clothing," instead of  producing "costume." There is a difference. Costume is an antiquated word used for referring to an ensemble or a set of clothes, but in our society it has come to mean something else entirely; too often it refers to something that is flimsy and apes a certain character or era but is not made for long-term wear and certainly cannot hold up to the rigors of reenacting. These costumes are great for a fancy costume ball or Halloween, but they will not hold up to the dirty environment at fair, repetitive wear, and sweat!

Trying to communicate the changes I knew this Italian gown needed in the under structure in order for their investment to be protected proved to be too difficult so I let it go. I KNEW when the gown arrived they would understand, but that is a hard lesson to allow people you care about to experience, and bottom line is that my "advice," no matter how well intended, is more often looked upon as intrusive. People don't want their bubble burst. They have the picture of THAT gown in their head and they don't want to hear anything negative, so I have to sit back and let them discover it on their own. But I HATE it! It's difficult for me to sit on my hands and hold my tongue and watch my friends invest $400 on something I KNOW is substandard workmanship or something that won't hold up to long term wear. But many times people can't see "long term." They see my prices, or another comparable designer's, are double and they want it "Now," rather than to wait, budget, and make payments on an ensemble that will last many, many seasons at faire. (Provided you care for it properly and don't wad it up and stick it in a bin during the off season!)


The simple truth of the matter is that this is my livelihood. This is what I've spent the past 15 years researching and educating myself about; aside from the 30+ years as a seamstress. As such, I am hooked in at a level that your average do-it-yourself reenactor or amateur costumer is not. I have the benefit of networking with professionals in all levels of the industry, including film and theater, and many of whom are leaders in the industry and have access to the scuttlebutt and horror stories that people experience around the world with these fast fashion websites. So if you will permit me, let me offer you the fruits of that knowledge and research.

There are so many times I wish I could download the knowledge I have into all of you so that you can be able to "see" through my eyes and know what real quality looks like so that you can understand that this is not an attempt at self promotion. While I can't download all of that experience, I can give you some things to consider when you hire someone for a historical reproduction, or when shopping for a prom dress, wedding gown, a cosplay costume, or something for a fancy costume ball ordered on line.

As a consumer, these are some things YOU need to look for when shopping for ANY clothing on line - be it bridal, cosplay, or prom, but more specifically historical costuming:

1 -  Where are they located? -

I personally would be wary of hiring a costumer (or clothing designer of any kind) that is not located in the same country where I live. Not only do you lose valuable legal recourse should you get burned (and believe me, you will when you allow "price" to be your only deciding factor) but there are some hurdles that present themselves that I will outline below. When your designer is located outside your country of origin fitting is tricky and can get expensive if they use the same methods I do! So unless you have vetted that designer, I would find someone local.

2. Are they offering "standard dress sizes?" I do not construct my garments on a one-size-fits-most standard dress size. You can't! Not for a gown with a fitted bodice, or for a bustledress, etc! My work is custom fit and constructed for each of my client's individual measurements. The first red flag should be when a vendor does NOT offer that service. I insist on a muslin mock up for my bodices. I drape a pattern off of a duct tape body form that my clients mail to me. Using this and their measurements is the ONLY way I can produce the most accurate fit.

3. Do they have pictures representing their TRUE work? 

While this has been an ongoing issue with bridal, evening, and cosplay, it has become an issue in recent years for vendors to steal photos of historical costumes from reputable designers and use those stolen pictures to advertise their substandard work. This is what happened in the examples I showed previously. Bait and hook. And when it arrives and looks nothing like what the picture does you've just lost your investment. Good luck getting your money back. It is very rare. Unfortunately, the biggest offenders hail from China, but India and Korea are offenders as well. My advice, stay OFF AliExpress or any of these fast fashion sites.

4 - Are they knowledgeable about historical garment construction, or are they a seamstress dipping their toe into the "historical" pond to try and cash in on what they think is a lucrative side job to bridal or prom dresses?

I saw another listing on Etsy from a bridal designer who took a modern corseted strapless gown and covered it in pearls, added a silk chemise and a french hood, labeled it "Renaissance" and tacked on a price tag of $2,000.

There is MUCH more to historical clothing design than sewing skills! There are construction and fit issues that are unique to each and every era, and your costume designer needs to have experience in that regard if you want a quality made garment. There is a plethora of information that even a professional seamstress will have NO knowledge about unless they did the appropriate research. Making a corseted gown and sewing on pearls does NOT make it historical!

5 - Do they use historically accurate patterns, or are they using Simplicity or McCalls, but don't have the knowledge to alter it to make it more historically accurate? Do they even KNOW that these patterns are not historically accurate? Can they draft their own patterns?

If you're a reenactor chances are it will matter to you if your ensemble is as accurate in styling as you can get. If you just want a "costume" for a fancy ball, cosplay, or Halloween of course this won't matter. 90% of what I see being sold on Etsy have been made from Simplicity and McCalls patterns and they don't look anything like an authentic historical garment at least not for the Renaissance and many of those from the Victorian genre. Your designer should know the difference between Medieval, Elizabethan, Early Tudor, Cavalier, Colonial, Rococo, Georgian, Regency, Napoleonic, early, mid, and late Victorian including Antebellum and Civil War, and Edwardian, and they need to know how to hack a commercial pattern to make it more historically accurate. 

6 - Are they knowledgeable about fabrics for the era their work represents? Are they only using 100% polyester fabrics they purchased on the clearance table?

There is more to design than fabric, but fabric can make or break a design - as shown in the examples I've offered you.

I'm not a member of what I call the "garb gestapo." Many elements in my designs would not pass the muster of those who are purists. Some people balk at my use of Rigilein boning which I use to make boning channels, but did you know our very talented, and lovely "American Duchess" uses zip ties for her corsetry and stays? It's purely a personal choice. There is no right or wrong if it works for YOU and it renders a suitable outcome. I tend to lean toward what I know will make it more durable AND comfortable to wear. But the one thing I do NOT make substitutions on is quality and I press for the use of quality fabrics, not what's on sale. Where I do fudge on historical accuracy, I try to make sure it would be in the realm of "possibilities," for that time period and I pay attention to detail work such as custom drafted sleeves, and supporting my silks with flatlining, etc. Look, I am constantly improving my techniques; constantly adding products as I make new discoveries, often through trial and error. I can't lie about that. There are things I do differently now that I didn't do a year or two ago - such as using fusible batiste linen. It isn't available here in the USA, and when it is it is marked up triple the cost that I purchase it in the UK. I didn't learn about it until I took a couture corsetry class from an instructor in Israel. I now line ALL of my silks and brocades with it to help add support and durability. It is used in all of the high end fashion houses. While it costs a bit more than the synthetic Pellon interfacing, it is made of natural fibers and it won't trap in heat.

7 - Do they have an "on line" presence? How accessible is the seamstress or designer who actually does the work? 

Do they have a website? Are they on Facebook - actually post their own updates?  Do they have a blog, etc.? Are you able to "see" their works in progress behind the scenes, especially YOUR order, to prove they are who they say they are and to make sure they are producing the garment you envisioned.

I recently offered to assist a woman who had hired a seamstress to make her gown but there was no communication with the client "during" the construction of her gown. When she saw pictures of the finished work she was hysterical! She had a deadline for an event in only a matter of weeks and the dress was nothing like what they had originally discussed. The seamstress had made changes without consulting the client. I saw the pictures and it was a hot mess.But there was more wrong with it than the changes she'd made. She used a McCalls pattern. I can spot them at a glance. It wasn't even CLOSE to an authentically styled Elizabethan gown. It's times like that when I wish I had a clone, because I hate seeing people paying hard earned money for work that looks like they purchased it at their local Halloween shop; however, I'm often too busy to help them.

So communication is a must! Can you communicate with your designer one on one, or is the person you contact regarding an order merely a facilitator? In other words, are they someone who only handles "sales" but they have nothing to do with the actual design and construction.

You should be able to see pictures of construction and follow the work to make sure you're getting what you paid for and that it meets your expectations.

8 - How long have they been in business? 

There are vendors from some of the locations I referenced - including those in the USA - who open and close their stores frequently due to high volume complaints. They misrepresent their products using stolen photos, or photos of a "sample" that does not represent the exact garment you will receive. When they are flooded with complaints, they close their Etsy or Ebay store and open another one in another name, and you have no recourse for receiving a refund.

I am not picking on businesses from other countries. There ARE reputable businesses, and there are disreputable businesses here in the USA! I'm simply offering you facts and a warning for "buyer beware." But experience has shown me that there is a higher risk that you won't get what you expected when you shop from fast fashion ads on Facebook or other sites on line.

That said, reputation in the costuming business does not always offer a guarantee! There are people in this industry who are well known among the costuming community who are disreputable. I have a client who found me after being burned by a well known matron in the costuming community who also has an Etsy store. She took my client's money for a gown, and my client shipped her fabrics to her. Months went by and she NEVER completed the gown order! She's an older/elderly woman and was having health problems at the time, but when she was back on her feet she did nothing whatsoever to make it right for this client. Repeated emails requesting a refund went unanswered, while she continued to take orders on Etsy! After a year or so, my client finally sent her another email requesting that she just return her fabrics back and to forget about giving her a refund. To this day my client has never heard back from that designer! Every time I see this woman posting on the historical costuming and corsetry pages I follow I have to bite my tongue and remember to be a lady!

9 - Get it in writing! 

I always write up a work order, and I make sure my clients understand that their deposit is non-refundable. Make sure you have a contract outlining your gown details, your deposit, and any and all financial arrangements, and make sure to read the contract! I have only had one client whose order I had to cancel and that was due to them defaulting on their contracted payments - and then it was only after I had given them three chances to bring their account current and honor their contract. When I did cancel the order I sent their fabrics back at my expense! I want to add that I hate it when I have to keep someone's deposit because they canceled their order! It has been RARE and when it has occurred I usually try to work with them so that that investment isn't a total waste, but that isn't always possible.

There are no guarantees when shopping on line, but there are steps you can take to lessen the "risk" of buying from vendors who you have no previous rapport. But I can say this - - AVOID these fast fashion sites like the black plague!

One more thing I'd like to add:

10 - Listen to the advice of your designer!

There are some real horror stories I and my fellow designers can relate. Mostly from brides, but I've had some clients that make me question WHY I got into this business. Unless a client has studied at a design school they will more than likely NOT have the same knowledge of style, body proportion, color, and coordinating fabrics and shades as a professional designer would have. You hired her/him for that knowledge...why would you ignore their advice?

One of the biggest nightmares I recently encountered was two years ago. This clients did not listen to my advice and bought fabrics without consulting me, and without ordering swatches even though I harped on that issue repeatedly! She was convinced that her vision would work and nothing I did could convince her otherwise. She had a color pallet she had downloaded from the internet and that was her only consideration when choosing her fabrics. If they looked "close" to the card when viewed on line, she purchased them. I had spent a year on and off consulting for her "dream gown." It was supposed to be a peacock themed Elizabethan gown. My design sketch was exquisite! I sketched several versions before we both agreed on the design. I listened to what she wanted, and using my knowledge came up with what I knew would be THE gown for her. I'd seen pictures of her. Knew what shades would complement her complexion, body type, etc. She loved the design. Loved the color scheme and detailing, and when she was finally ready to commit she sent in her deposit. When it came time to purchase her fabrics and ship them to me, she completely disregarded all of my expertise and previous advice and purchased a different fabric than what we had originally discussed! - silk velvet! Which is a very delicate fabric and not something that would stand up to the rigors of reenacting long term. She didn't order swatches for the "coordinating" fabrics for the sleeves, sleeve lining, and forepanel. She matched her colors by looking at them "on line," rather than viewing the fabrics in person. When she shipped her fabrics to me I found myself peering into a box that looked like a court jester's costume.


(See the photo to the right. There was also an electric blue polyester faux silk she wanted me to use as well but I didn't photograph it.)

She wanted EACH of these silks used in the gown - one for the sleeve lining to show through the panes, one for the lower sleeve, one for the forepanel, and ALL of them used for piping in various areas throughout the gown. Incidentally, she stated she didn't like peacock blues and greens. WHAT??

We were already two weeks into her allotted time slot (she had waited until two weeks before construction was to begin to begin shopping for her fabrics). I tried to fight for the integrity of the design she had initially contracted me to make - a peacock themed gown - but she absolutely refused to concede that a gown with these FIVE different colors of silk would NOT render the "vision" she had in her head.

As a side note, unless it's a floral or print, there should never, EVER be more than THREE separate colors used in any ensemble! - But the color of your shoes counts as one color, so usually we keep it to two colors.

A reputable designer will KNOW fabrics, know colors, know how to use a color wheel to find coordinating and accent colors, and be able to guide you on what fabrics work best for your respective gown. Be willing to compromise your "fantasy" for reality. Designers are "artists" - at least THIS one is - and if you're willing to share the reins you'll be happier with the result, rather than holding rigidly to the fantasy in your mind like the client I referenced above. Unless you have a picture of a gown you want reproduced, a reputable designer will have the integrity to tell you when it would be a hot mess.

There are times that my "sketch" just doesn't translate into reality, and I have to make changes in order to maintain the aesthetic and quality of the garment. If your designer is worth their salt, they will not be afraid to tell you "No!" - LISTEN TO THEM!

Don't be afraid to ask questions! Don't be afraid to ask for references! Read their Etsy reviews - if you're shopping on Etsy. Ask if they have a Facebook page. Do your due diligence for your investment. Don't be afraid to ask for pictures or pictures of their current works in progress. But more importantly, please rethink making "price" the deciding factor. I cannot stress that enough.

I know that my fees may seem exorbitant at first glance, but you have to consider the "service" and the CUSTOM factor into that purchase.  Truth is, I don't charge half what my ensembles are truly worth because I want to keep them within the range of possibilities for ALL of you. If I charged by the hour my gowns would retail for no less than $6,000 and up. There is no substitute for quality. The red gown in the article (pictured at the top of this blog) would fetch a price for no LESS than $1000! That doesn't include cost of labor and materials to drape and pattern a muslin mock up necessary for an accurate customized fit! Even if you order a gown from a reputable design house alterations need to be made to fit it to your particular body and alterations can run anywhere from $150 to $300 and up.

If you're purchasing a gown or costume on line for LESS than what the fabric alone would cost, you need to be prepared for huge disappointment. The same applies for a gown that is half the cost of a reputable designer. A quality historical reproduction will cost more than $400. When I say "quality" I mean:

- Does it "feel" sturdy in your hands?
- Are the seams and edges clean?
- Does it lay nicely against the body or are there "puckers" in the fabric?
- Has the designer used something like fusible linen batiste (my preference) for silks and silk brocades to aide in giving it more structure?
- Is there buckram and light boning in the stomacher (front) portion to give that smooth appearance?
- Is the hem done by machine or is it hand stitched and pressed?
- Is the trim sewn by machine or hand stitched?
- Are the grommets couched? - or are they simply set in what amounts to two layers of fabrics and pull or tear away after lacing them a couple of times?

There are MANY more things I look for, but I could be here all day!

If the designer you chose doesn't use these techniques then they are scrimping on the inner construction or the quality of fabrics to make more profit. Either that, or she/he is making half what their labor is truly worth to try to undercut other designers in hopes of directing sales to their store. But again, is it really a bargain?

Most reputable seamstresses and designers charge $20 to $40 per hour. Bridal is usually priced out at the high end. Historical reproduction clothing is every bit as intricate as bridal - if not more! There are construction techniques that your average seamstress doesn't know, especially someone working in an industrial setting in a sweatshop somewhere in China making pennies an hour. They are focused on production, NOT customized fit. There is a REASON that couture gowns cost as much as they do!

If ever you are in doubt PLEASE contact me and I will steer you in the right direction. If I can't help, I will try to find someone who is available. 

Furthermore, if you have been burned by a disreputable vendor or you want to do your due diligence on a vendor you're considering using, check for reports on Better Business Bureau, and do some research before purchasing from a new site. Unfortunately, the BBB cannot really help you with a purchase made in China or the Ukrane, but with perseverance and an eye for detail, you should be able to avoid losing any money to these substandard vendors!

Shop smart!!