
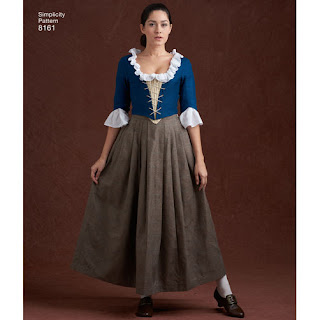
I'm starting this working class bodice and stomacher commission soon for a client who wants me to reproduce the Outlander costume in the picture to the left.
I will be using the American Duchess Simplicity 8161 as a base, but will be making my own alterations, or "Hacks" as Lauren calls them, to make the pattern more historically accurate - But because my alterations to reproduce this look are rather extensive, I won't be including them here. I'll save it for ANOTHER tutorial for more intermediate sewists and costumers. THIS tutorial is for the Novice or someone who is new to costuming, and new to historical fashion.
In addition to MY own alterations, I am including Lauren Stowell (American Duchess') "hacks" which are available in PDF form in a link. Once you become more familiar with some of the techniques you see here, you may wish to take up the challenge and REALLY take your historical accuracy further using Lauren's instructions.
Why am I writing this tutorial? Basically, for those who are new to costuming, and even newer to sewing. Some have expressed difficulty in following the Simplicity instructions. Since they stopped offering Home Economics, many of the upcoming generation of sewists are not familiar with many of the terms in the instructions. But, more so, they, like me, are visual learners. We learn by doing! I struggled in college with "book learning." How I maintained a 4.0 is beyond me. I had to work extra hard. I learn better by listening to lectures OR visual instruction. My auditory recall is excellent - which is why I excelled as a medical transcriptionist. I am severely left-brain challenged. No seriously! This is why I found learning to flat draft patterns using measurements ONLY very challenging. It took me a YEAR before the light bulb finally came on. Reading from books to me sounds like the teacher in Charlie Brown cartoons.... "Wah...Wah...Wah...Wah...Wah?" This is a challenge indicative to right-brained dominant people. So, I have offered to write this tutorial to assist those of you who need more visual instructions and less "technical" jargon to construct the Outlander pattern with some historical touches added here and there.
Now, if your goal is for a higher degree of historical accuracy, this tutorial won't accomplish that. What I am offering are some doable alterations that a novice can use to alter the pattern that will make your American Duchess Outlander costume a bit more passable. If you're looking for historical accuracy, I recommend J.P. Ryan or Larkin & Smith patterns. Some have expressed that they cannot afford these patterns; so if that's the case, then it IS possible to make alterations to the American Duchess Pattern, but it will take some rather extensive redrafts. This tutorial is a good stepping off place.
But before we start! . . . PLEASE do NOT cut your pattern out of your fabric yet! There are steps to take FIRST! If you have already done so, well?. . . you won't' be able to make the alterations for historical accuracy. :( But you can keep reading, as there is valuable information you will glean.
By the way, please feel free to post any questions you may have in the comments and I will do my best to answer them as you follow along!
First - A little pep talk:
The most important thing to overcome when you start out is CONFIDENCE. Some may feel it is counter productive to learn via short cuts. I know that because I was taught by my grandmother who was an accomplished seamstress and a perfectionist, but a very gracious and positive teacher. I picked out more seams than I can count with her gentle admonition to "do it right the first time." However, not everyone wants to produce a completely historical garment. They just want to have a fan-girl moment and geek out with the rest of the Outlander enthusiasts. The historical accuracy and pattern drafting and construction techniques will come as your confidence grows! Pretty soon, you will be purchasing those expensive patterns as well as adding to your reference library.
So, for those of you who are here to learn - - PLEASE don't skip ahead to the construction section. I KNOW it's a lot of READING, but the information and the order in which we proceed is critical to your success.
So. . . let's begin by gathering the supplies you will need in addition to the fabrics and notions the pattern calls for.
MY ADDITIONAL SUPPLIES:
- Swedish Tracing Paper 24" wide. (I buy it on Amazon)
American Duchess Simplicity 8161 - Ruler
- French Curve (See link below)
- #2 Pencils
- Scissors (for paper)
- Scotch Tape - Wrapping Tape
- Plain Muslin (about 2 yards) for toile.
- Measuring Tape
- 2 yards 100% Cotton Stayflex Fusible Interlining*** (See link below)
- 12 to 16 Grommets (1/4 inch)
- 2-skeins of embroidery thread in matching color of your bodice.
- Tapestry Needle (sharp pointed not blunted)
- 4 yards Synthetic Whale Bone 10 cm wide, or 1 pkg of 125 Lb PSI Plastic cable ties 14" long (sold at Lowes).
- 1 pkg 75 Lb PSI Plastic Cable Ties (You will use these on the stomacher as well)
- Slide Ruler.
- 18th Century Stays.

https://www.macculloch-wallis.co.uk/p/4671/fusible-woven-knitted/mw/general-purpose-fusible
http://www.bblackandsons.com carries it for $7.50 a yard. But I purchase it in bulk from Macculloch & Wallis. The shipping isn't all that expensive and I actually save money. But if you don't have a couple of weeks to wait for shipping, then you might want to purchase it elsewhere, but it will cost more, especially when you factor in shipping on top of being $3.50 more a yard.
Why Stayflex? Why not the polyester Pellon iron on stuff? In a word - - It's an inferior product. Because it's made of nylon polyester, it isn't as pliable. It's made of synthetic material rather than cotton or linen. It also doesn't fuse a well as Stayflex which has a low temperature adhesive. No, it's not historically accurate, but it's a better product. Stayflex gives your fabric needed support without making it look too stiff. Pellon products also give an "orange peel" effect to your fabrics (especially silks and cottons) that no amount of pressing will alleviate. I flat line each pattern piece with Stayflex before sewing my garments together. It is a wonderful stabilizer for fabrics that might stretch, like linen or wool, but it is useful for cotton chintz as well.
What's a French Curve???

It's a tool that is used for pattern drafting; specifically curved lines, neck and armholes.
Purchase a Lance 9" French Curve $5.99 Here.
MY PLANNED ALTERATIONS TO THE PATTERN:
- Elongate the bodice point in the front.
- Joining Side Back piece to the Front piece for more historical accuracy.
- Add a Small Peplum to the bottom of the bodice.
- Optional: Add a Princess Seam to the bodice Front for a more contoured look.
- Altering Shoulder Seam Placement for more historical accuracy.
LINK TO LAUREN'S (AMERICAN DUCHESS) PATTERN 'HACKS':
https://drive.google.com/file/d/0B5RoaVAG1geGYVEwSldqRnpQajQ/view
TRICK FOR DRAWING SEAM ALLOWANCES:
- Rubberband two #2 pencils together for a 1/2" seam allowance.
- Rubberband three #2 pencils together for a 5/8" seam allowance

PART ONE:
Taking Your Measurements:
PLEASE READ: It is very tempting in our excitement and enthusiasm to DIG into a project and start cutting out our pattern in our fashion fabric and ignore taking our measurements. We know our dress size, right? Unfortunately, this is not the way you judge your appropriate pattern size.
Any pattern, including Simplicity, McCalls, Butterick, etc., will not be an accurate dress size. In fact, dress sizes in retail clothing are all subjective. No fashion house has standard dress sizes. A size 12 in one line will be a 10 in another. You cannot go by a standard dress size, especially when sewing with commercial patterns!
Go by your measures! - Even if it means you will go up 4 or 5 dress sizes! I wear a 12/14 dress size but I had to cut my stays to a size 20! WHY? Because the size 14 measurements were way too small, and the 20 was the closest to my actual measurements in THIS pattern. For instance, my professional dress form that is a size 16 is actually more accurate to a women's size 10 dress!! Now, with stays, you want to allow for a little reduction so you could possibly go down one size (if you're using the American Duchess pattern), but not with outer garments.
Many women nearly faint when I tell them the dress size I actually cut out for them. So, I usually just withhold that information. Up-sizing your dress size in a sewing pattern means absolutely nothing about you! The clothing industry is WHACK! Don't let a silly NUMBER dash your self confidence! Chances are, you've invested in rather pricey fabrics, especially if you choose 100% wool, and you want your Outlander costume to fit properly and comfortably. So, please, IGNORE the dress size on pattern packages and use your actual measurements! Be gracious to yourself!
NOW FOR YOUR MEASUREMENTS:
First - - You will need to lace yourself into your 18th Century style stays. If you don't have your stays yet . . . Stop here and either purchase some; or if you plan to make your own, wait until you've finished your stays before you proceed. This will be absolutely necessary in order to ensure a proper fit of your bodice and petticoat, and avoid cutting the wrong size!
 |
| Client Commission |
https://www.etsy.com/listing/484359705/18th-century-corset-stays-outlander?ref=shop_home_active_3
I offer payment options: A LAY AWAY with either a 40% deposit and the remainder due upon completion; or, four automatic monthly payments of $74.50, or 8 bimonthly payments of $37.25 via PayPal through my website: www.DesignsFromTime.com.
 |
| MY Current Stays W.I.P |
Please do NOT wear a bra when you put on your stays to take your measurements! It is best to take your measures wearing the exact stays and smock you plan to wear with your completed costume. If you do NOT have your smock made, but you DO have your stays, you can wear a thin camisole or thin, snug fitted tank top. It isn't going to be exact, but since this particular bodice (View B) does not close in front, you can get a way with some minimal variation.
Second - Don't lace your stays too tight! Lace them to what will be comfortable but snug and offers support, especially if you plan to wear them for more than an hour! They should not be so tightly laced that you can't breathe or movement is uncomfortable or painful.
PLEASE NOTE: It is important that your stays are laced to the exact amount they were when you took your measures or the bodice may not fit properly when completed. So please avoid too much reduction.
Now, wearing your smock and stays laced up comfortably you will use your tape measure and record the following measures(see below).
- Bust
- Rib Cage (Under Bust)
- Waist
- Hips
- Back length from the base of the neck to the waist.
PART TWO:
Pattern Alterations:
Using your basic measures wearing your stays you now know what size pattern to use. :)
Now, you will need to trace your pattern. You can make alterations on your original, but these will be permanent. I like to work with a tracing. That way, I save the original pattern for a base to make other styles. I also don't cut my patterns out by individual size so that all the sizes are intact for later use.
You will need a flat, hard surface to work on, i.e., dining table, or fold out table - Whatever area you have. Carpet is not recommended.
Now you will need the following supplies:
- Swedish Tracing Paper
- Straight Ruler
- French Curve
- Pencils
- Scissors (For paper)
- Scotch Tape - Wrapping Tape
- Slide Ruler
Step One:
- Lay your tracing paper flat on your work surface.
- Cut out a manageable width of paper to keep the roll from rolling off the table - or rolling back and getting in your way!
- Starting with the FRONT bodice piece (Pattern Piece #1), place it underneath the sheet of tracing paper. (My work table is black. I find a lighter color surface works better for tracing).
- Pin the pattern to the tracing paper so that it does not slip. It's best if your pins are in the center, otherwise they can get in the way of your ruler and french curve.
- Using your French Curve, ruler, and a single pencil, trace the front piece pattern all the way around (according to your size determined by your measurements) onto the tracing paper.

- Mark all DOTS and diamonds (notches) on your traced pattern according to your size.

- Now, unpin the front pattern piece underneath and remove it.
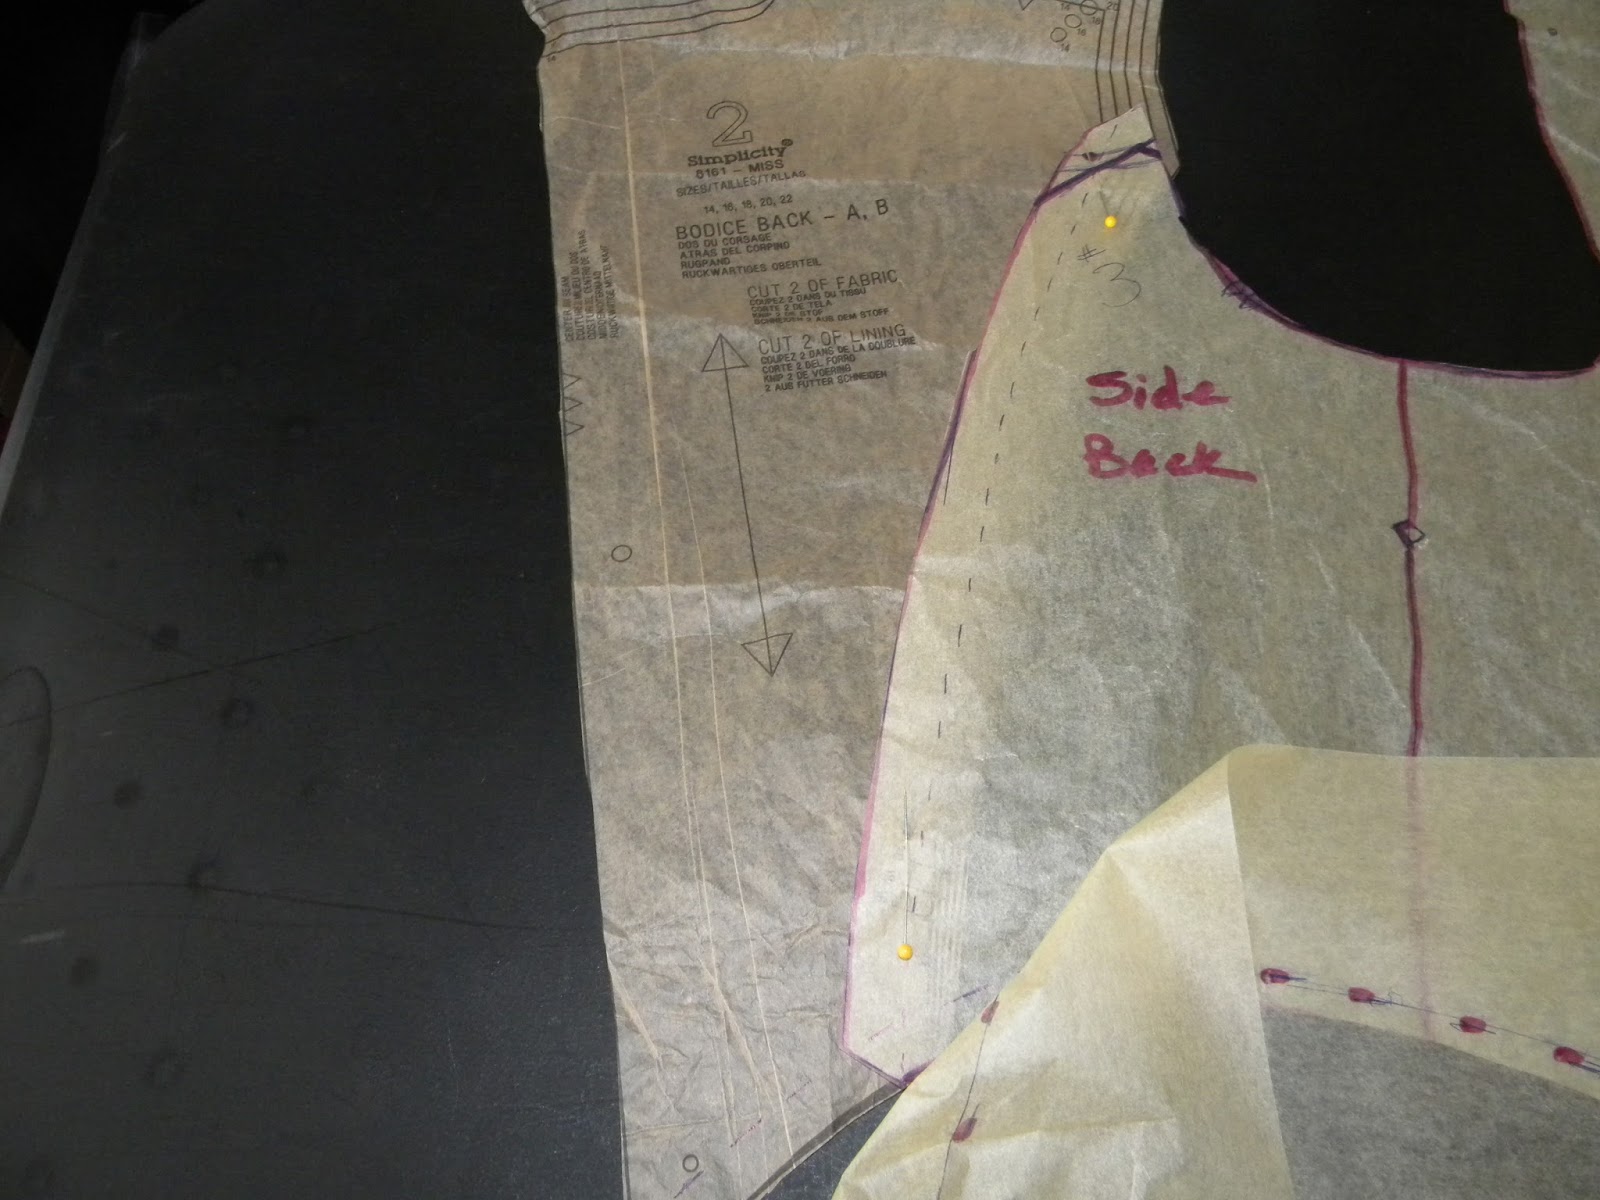
- Now, find your "SIDE BACK" (Pattern Piece #3).
- Slip it under the tracing paper and match it up to the Bodice Front, overlapping the side seams as you would if you were to sew these pieces together.
- Scoot it over to the right just enough to allow for regular seam allowance, approximately 3/8". If you don't take away the seam allowance here, your bodice will be that much too big. It may not seem like alot, but by the time you add 3/8 to 1/2 inch on each side you will notice it.
- Now, transfer all the dots and diamonds (notches) from the original pattern to the traced Side- Back piece (#3) that you have now joined to pattern piece #1.
Now, if you are making View A of the American Duchess pattern, you will need to follow Lauren's Hacks to make the bodice fronts meet and to change the neckline. If you need help . . . just holler . . . and I can post a demo on my Facebook page: Historical Costumes by Designs From Time. This particular tutorial is for View B for the Lady Broch Tuarach costume.
- I also traced my seam allowance on the side back (Below - Left Side) with blue pen, so it's not as visible. But you will need this as a reference in a bit.

- I traced a seam allowance on the bodice waistline of the pattern so that it grows narrower near the side back/front side and front piece. I like it to be a little longer and 5/8" seam allowance, I find, is too much. The Simplicity pattern sits a bit too high for my taste. If you want a larger seam allowance, you can add it to the bodice pattern so that you don't lose that length.

Step Three:
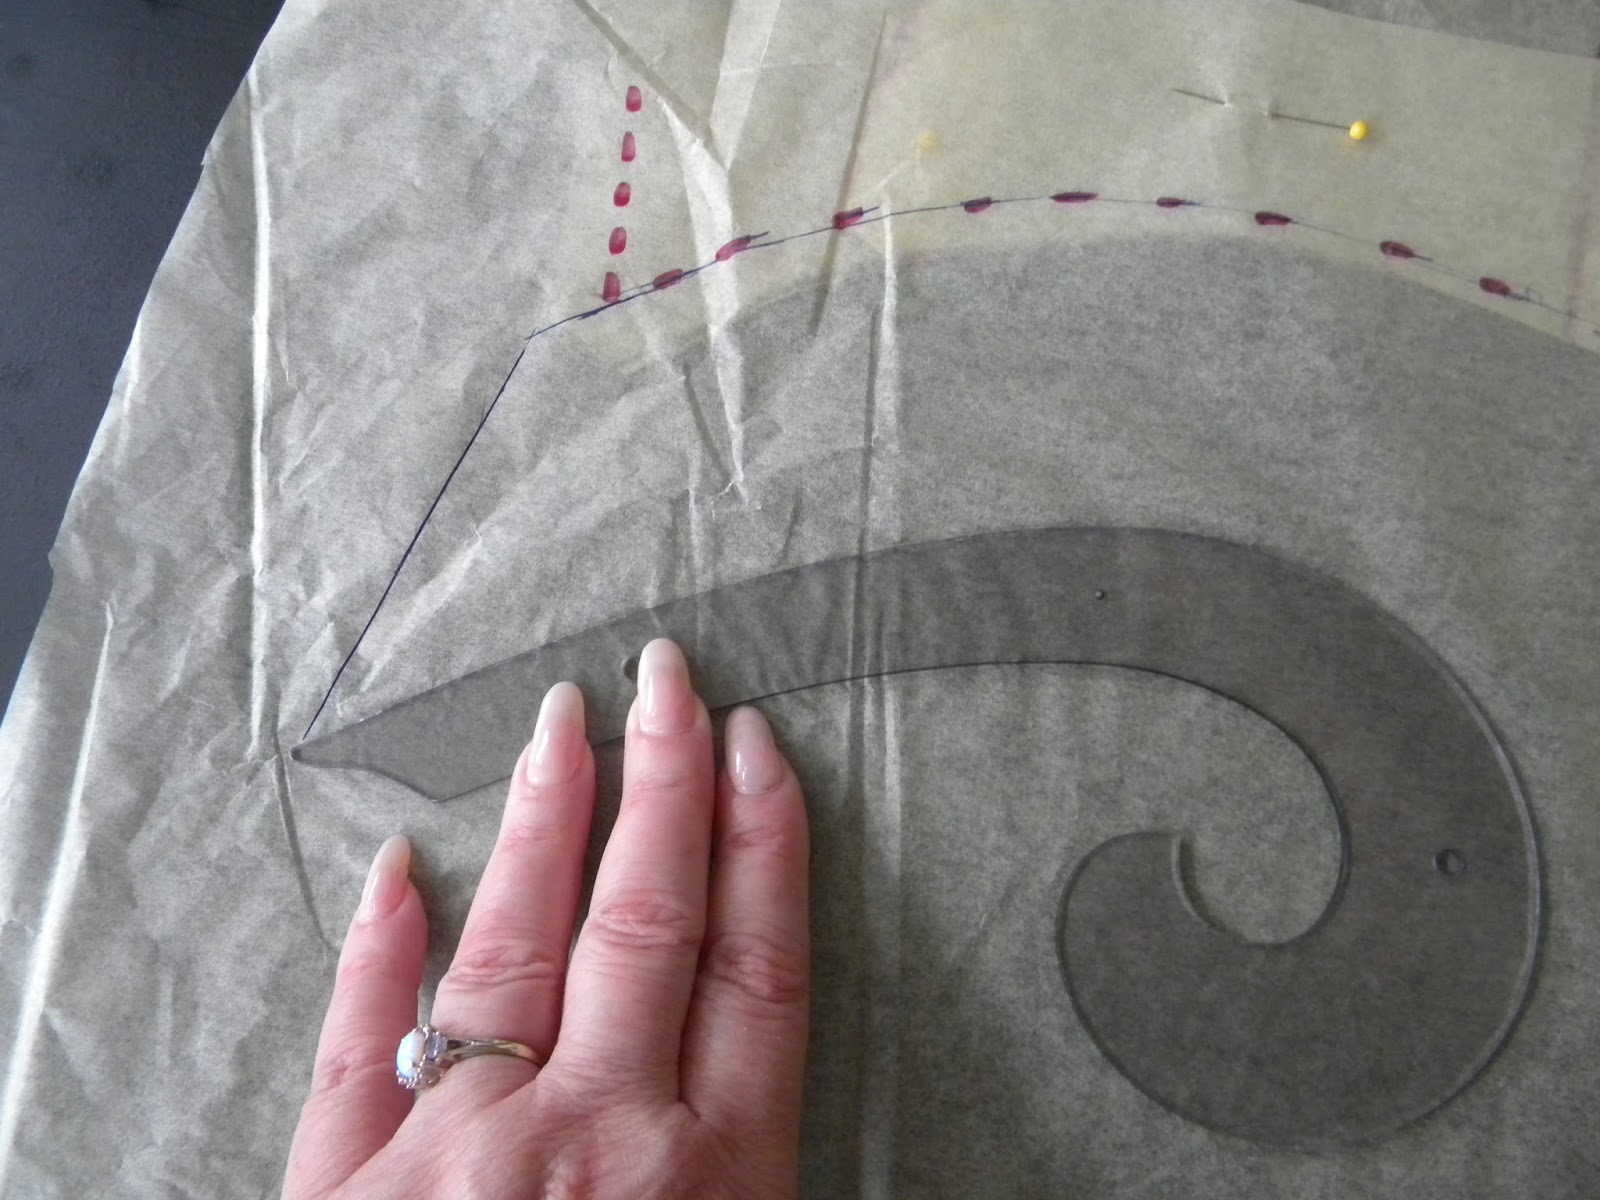
Now, we are going to lengthen the "point" on the front of the bodice.
- Using your ruler, extend the front traced line (see the pink ink?) That's the line. You can see the original pattern underneath by the darker shading.
 |
| Picture #1 |
- I've lengthened this line about 1 to 1-1/2 inches.
You can make the bodice point longer, wider, and more squared for other bodice styles.
(See the picture below for examples of other/later 18th Century styles).
 |
| 1785 to 1790s |
 |
| 1780s |
Continuing on with the bodice point . . .
- Now using your French Curve, join the bottom curved edge to this extended line to elongate the point. See picture #2 below.
- The second line underneath the first is for "seam allowance." See picture #2 below where the arrow is pointing. If you don't add some seam allowance here, when you make your seams your point will not be as noticeable. You WANT it to be more elongated to look more like Claire's bodice.
- Check to make sure your line is drawn evenly. It looks like mine might have slipped a bit. I will need to redraw this BONING CHANNEL line and lacing holes. They are a little off here. See how the line for the boning channel at the bottom looks wider? It should be even to the original point on the pattern.
 |
| Picture #2 |
Step Four

OPTIONAL PRINCESS SEAM:
Now - I'm going to offer you an OPTION.
If you want your bodice to fit exactly like the reference picture (See Right) you will need to make an alteration to the front of your bodice.
Basically, you'll be adding a "princess" seam.
If you do NOT add this alteration your bodice will fit more flat against your torso. If you want a more sculpted bodice, like Claire's, then make these change.
- Draw a curved seam in the front of the bodice as I have done in the picture below using your French Curve and ruler. (See Picture Below)
- Now, cut the pattern out on that new line. You will need to either tape enough tracing paper to your original tracing to add your seam allowances, or retrace new pieces. This will give you an opportunity to clean up your paper pattern and make any notes or additional marks or sewing instructions.
Step Five:
- Now - Find your Back Piece (pattern piece #2).
- You will now need to trace your size as you did with the other pieces. Make sure you mark all your dots and diamonds (notches).
- Slip the Bodice Back piece under the tracing paper and match up your DOTS from the Back to the Side Back as you did before.
- When I matched the bottom piece to the side back it was longer. However, you will need to allow for "ease" here. What that means is that you must allow for the "curve" when sewing these two pieces together. When laid flat next to each other your pattern will appear longer. This is why I usually make a muslin toile (mock up) before I cut out my fashion fabrics. BE PATIENT. This step will save you from wasting fabric!
- If the back piece and side back pieces don't match after you sew your toile together, THEN you can adjust your pattern as shown below - or trim the excess.

Step Six:
Now we're going to draft the peplum! The narrow little "bodice" skirting piece.
- Cut out your traced pattern, combining the new front Princess Seam, new Side front/Side back, and slip them under a fresh piece of tracing paper. You don't need a full sheet. I used some scraps to conserve paper.
- Take your Back Piece and match it up to the side back curved seams. Overlapping for SEAM ALLOWANCE - Reducing it just like if you had sewn the pieces together.
- Pin your pattern pieces together. (I forgot to trace the back piece! So I just used the original for example purposes). See picture above. I lined up the correct size and overlapped them to allow for seam allowances so that your peplum pattern will be drafted to the finished waist circumference.
- Next, trace the seam allowance of all three pieces along the bottom edge (waist seam). See picture Below.
- Trace the seam allowance where your Center Back Seams will be joined. See horizontal pink dots/slashes?
- Now extend your tracing of the bodice waist seam line along the bottom so that it meets the actual pattern edge underneath. See how it extends past the traced Center Back Seam Allowance? You can see the pattern beneath to judge where the actual edges stop. See picture Below.

- Now connect these slashed lines (seam allowance for the bodice waist line) using your French Curve.
- Next, extend a slanted line from where your waist line ends (matching the Center Back Edge). See how my blue pen line extends past the pink dots that I've marked horizontally (top to bottom) at the center back pieces? This is the edge of the true pattern underneath. (See Picture Above).
- Now, using your French Curve, create the hem line of the peplum. It will curve, gradually narrowing as you extend it to the front piece.
- If you need more guidance for this curved line: Mark a dot at the end of your slanted line (approximately 3 to 4 inches). Use a ruler and mark another dot 1 inch below the seam allowance about midway of the bodice. Now mark another about 1/2 inch below the seam allowance line near the bodice front about two inches from the LARGE dot near the grommet holes. Now, using your French Curve connect them. (See picture below for picture of finished pattern)
- Don't take the peplum all the way to the front facing! The peplum sits back a little from the front point - As seen in the picture below.
 |
| You can make yours longer than 3" - My client wanted hers to be more subtle. |
- I have traced and cut the peplum pattern to the actual size it would appear if FINISHED.
- Because we've linked the pattern pieces together as they would be when sewn together, taking away seam allowances, you do NOT need to add seam allowance to the center back of the peplum pattern. We've already drawn it to fit - taking into account the seam allowance for the center back, etc.
 |
| Swallowtail Caraco Jacket |

Now in this picture (left) from Outlander the bodice doesn't really have a separate peplum sewn into the waistline; rather the bottom of the pattern pieces are "flared" so that when sewn together they creates a peplum. To do this would take some more extensive drafting, so I am just simplifying it for you by creating a separate little peplum.
However, Lauren from American Duchess has given instructions in her PDF handout that shows how you can draft these flared shapes without having to sew a peplum into the waist. See her hacks for a Caraco Jacket without waist seams. The technique is pretty much the same as you would use to create this bodice, except the skirting of this bodice isn't long.
Here's the link to the American Duchess PDF handout once more:
https://drive.google.com/file/d/0B5RoaVAG1geGYVEwSldqRnpQajQ/view
NOTE: If this is just too much, I DO offer this bodice in my Etsy store with these more extensive pattern alterations to create a more authentic reproduction.
Here are some more options for a peplum - Which are offered in the American Duchess Handout:
 |
| Peplum shown here in profile |

This is the stage where your muslin toile will be crucial!! Work out your final "shape" and pattern in muslin and make changes as needed. Trust me! You will save yourself a lot of grief if you work with a toile FIRST and perfect your pattern, making adjustments to fit your shape, etc. You can then mark your toile, pick the seams out and retrace your pattern using the muslin for an exact fit. You will then have a customized pattern that you can use in the future, knowing it will fit without a lot of alterations.
Step Seven:
Continuing to Draft the Peplum:
- We need to add our seam allowance to the top and bottom of the peplum pattern. Using the trick I showed you in the beginning (rubberbanding two pencils together) draw your top and bottom seam allowance using your french curve as a guide.
- If you have a dress form, you can pin your finished pattern pieces onto your dress form. This will allow you to see how the peplum will lay. If not, you can work out the peplum on your toile.
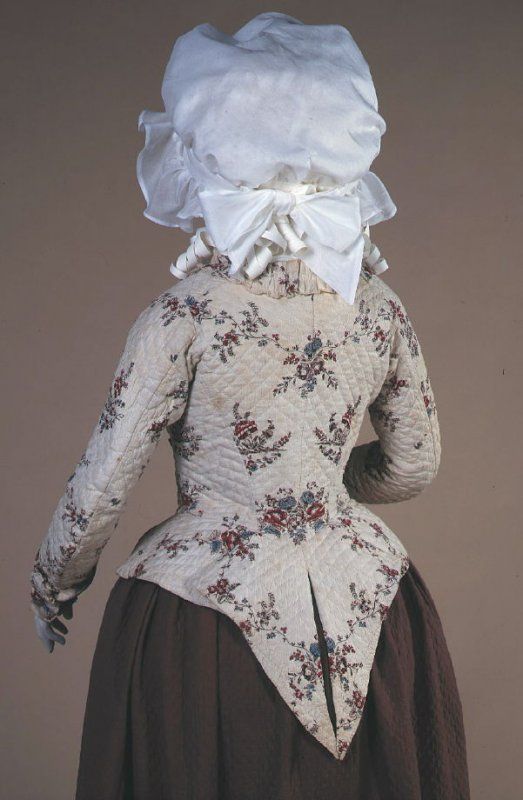
- The bodice pattern for Simplicity #8161 is peaked or pointed in the back. (See picture below) You may need to make some adjustments to the slant of your back peplum points if you choose a swallowtail. Once you've sewn your toile together (use basting stitches on the machine) you can trim these pieces so that they lay properly.
- If you DO trim your "swallowtails" you will need to retrace your pattern to 'ADD' your proper seam allowances once more.
 |
| Simplicity 8161 Bodice Back View: Pointed |
- Now trace your sleeve pattern to the appropriate size. Taking care to make sure you've added the pleat marks, dots, seam allowances, etc., and cut out your paper pattern.
NOW - Before we continue. . . I am going to go over one of Lauren Stowell's (American Duchess') pattern hacks available in her PDF handout. You can either use the simplified version that we've already drafted, or you can take your pattern alterations a bit further to make it appear more historically accurate. It's YOUR choice. I've written this tutorial for those who are newer to costuming and haven't done much pattern alterations or drafting. So those of you who are more accomplished, please keep that in mind. This is my attempt to break down these alterations to bare bones and make it basic enough that a novice can experience a feeling of accomplishment, and perhaps go on to study draping and pattern drafting like I DID!
Altering The Shoulder Seam Placement.
- FIRST: Before you go any further, pin your back piece and your combined front/side back-side fronts pattern together at the shoulder seam.
- Now, lace yourself into your stays and gently, without tearing your pattern paper, smooth it down against your torso to check where it will fall at your waistline.
- You will get a better idea how it fits with your muslin toile, so you can SKIP THIS if you wish to work any fit issues out in your muslin toile. But if you find your paper pattern or muslin toile rides up too high (especially if you're longer waisted) you will need to make alterations to your pattern to lengthen either the waist length of all pattern pieces, or your shoulder straps. I usually start with the shoulder seams as it's the simplest fix.
- However, if after lengthening the shoulder strap a little and the bodice is still too short you will need to alter the waist or torso length on your pattern pieces. You cannot just cut it longer at the bottom, you have to find the waistline on the pattern and elongate it by cutting the pattern piece in half, then add length by inserting a strip of paper and taping the pieces back together. You will need to make sure all your pattern pieces line up evenly after making any additions to the waist length.
- Before you make such drastic alterations, try adding a little length to the shoulder strap. It will be easier to just take away that little length than to alter ALL of your pattern pieces. (See Picture Below)
- Adding length to the straps will affect the size of the armhole (or armscye). So if you lengthen your straps you will need to alter the sleeve pattern width as well - adding the same amount to the pattern as you did to the shoulder. So if you added a 1/2 inch of length to the straps, you will need to add that same amount to the sleeve width; otherwise, the sleeve will be too small to inset it them into your bodice's armholes.
- Rather than to just add width on the seam allowances of your sleeves, you need to split it straight down the middle lengthwise and widen it by spreading it apart to the same measure you added to your shoulder straps.
- If the sleeves are too loose around your upper arm after adding width, you can always adjust the fit in your muslin toile then redraw your pattern from your muslin toile.
- Now check the fit once more on the bodice with the altered shoulder straps. If it solves the issue, GREAT! We can move on.
- Now that you've checked the fit for your overall bodice and shoulder straps pattern, lay your back piece and your combined front/side-backside to the new Front patterns flat on the table and overlap them at the shoulder seams to take away your seam allowance on the princess seams. Now over lap the seam allowance of the shoulder seams. Now tape shoulder seams together with scotch tape.
- Next, you will REDRAW the shoulder seam with your ruler as shown in the picture below.
(Insert Picture - Redrawn Shoulder Seams)
- Next - add seam allowance to the new shoulder seam placement on both pattern pieces. T
- We added seam allowances to the peplum pattern we drafted.
(Insert Photo)
- Next, cut out the peplum in muslin (Cut 2).
- Fold your seam allowances over at the center back seams (slants) of the peplum as seen in the photo below. I pressed them over so that they would stay.
- (Insert Photo)
- Now, lay them on the table with the left and right pieces facing each other as seen in the photo - with your "swallowtails" meeting at the center as they would if finished or sewn into your bodice waistseam.
(Insert Photo)
- Lay a sheet of tracing paper over your left and right muslin pieces (peplum).
- Next, use your french curve and trace a curved line at the bottom of the triangle or gap - joining them.
- Now, trace your seam lines (where you've folded the muslin over) and trace the triangle at the sides joining them at the top most point. (See Photo)
- Now, remove the muslin pieces and widen the bottom of your triangle. This will allow a bit of fullness and add a little ruffled affect. (See picture)
- Cut out your paper 'gussett' (triangle) and pin it to your peplum pieces.Make sure your edges meet on both sides. If not, true up your lines.
- If you like the shape, then cut it out of muslin, and proceed to Step Nine.
- If you want to make a longer "skirting" than the peplum we've drawn, then follow the "Handout" I've linked you to for American Duchess.
Step Nine:
Since you have lengthened the front of the bodice, you will also need to lengthen the stomacher.
- Fold the stomacher pattern in half.
- Now match up the bottom seam allowance to your newly drawn bodice front. The stomacher will sit just below the point of your bodice.(See the picture at the beginning of this blog post for reference).
- Lengthen the top of the stomacher so that it sits where the dots have been traced.
PART THREE:
Fitting Your Muslin Toile:
- Now, cut out your pattern in muslin and stitch up all side seams and your shoulder seams, and sew in your sleeves, AND your peplum.
- Now, Lace yourself into your stays and try on your muslin toil inside out so that the seams are facing outward. This will allow you to make tucks and minor adjustments to side seams etc. That will be particularly necessary if you have made your front bodice edges to meet in front.
- Tug the toile up around you so that it sits properly and pin it in place to your stays.
- Check your shoulder seams to make sure your armholes aren't too tight or too loose.
- REMEMBER: This particular bodice will NOT meet in the front! There will be a gap where it will be laced and your stomacher will show through.
PART FOUR - Bodice "B" Construction:
Step One:
- With your new and altered pattern pieces traced out on paper once more, including any fit or alterations you found necessary in the muslin toile, lay out your bodice pieces on your fashion fabric. Follow the arrows to cut on the proper fabric grain.
- FOR BETTER FIT: Lay your lining fabric underneath your fashion fabric and pin pattern pieces to all four layers. Cut out each pattern piece this way. This will ensure exact matches for each pattern piece. You will need VERY sharp sewing scissors that have not been used on paper - Just fabric.
- Cut out two sets of Stayflex cotton fusible interlining for each pattern piece - one for your lining and for for your fashion fabrics. You will be using it to flat line both your fashion fabric AND your lining pieces.
- Carefully match up each interlining and with its corresponding pattern piece. If your fabric doesn't have an obvious RIGHT side, make sure your pieces are laid out properly so that you don't fuse your interlining to the wrong sides. With your iron, fuse each interlining piece to its corresponding fabric pattern piece.
- Now, carefully trim any excess edges of the Stayflex. This is IMPORTANT for accurate seams.
- Stay stitch about 1/2" to 1/4" along the edge of the back pieces at the neckline of your fashion fabric, as well we the front neckline pieces. (As shown below)

- For more accurate seams, take your pencil and your ruler and your french curve and turn your pieces to the wrong sides - the sides where you've fused the interlining. If you use a ballpoint pen, make sure and test it on a scrap of fabric to make sure the ink won't bleed through to the right side of your fabric.
- Now, take a slide ruler and measure out either 1/2" or 5/8" seam allowance. Mark the seam allowance at the bottom, middle, and top of each pattern piece seams - both the fashion fabric and your lining pieces
- Now, using either your straight ruler and/or your french curve, connect these dots and carefully MARK your seam allowances. You only need to mark ONE side rather than both sides.
- When you are ready to sew your pieces together, if you've taken care and marked your seams neatly and accurately, you can use these lines as your stitching guide on the machine. This is especially helpful for novices who don't quite feel confident in sewing a straight seam line. Go slow and relax. Keeping your needle on that drawn line. If you want to practice first, draw some lines on scraps of fabric and practice keeping your needle straight. Try not to tense up. If you do your seams will turn out crooked.
- Now find your Back pieces in both your fashion fabric and your lining pieces. It saves time if you sew both your lining and your fashion fabric pieces at the same time, rather than sewing up the bodice and then having to start from scratch with the lining.
- If you want to be really efficient, you can feed each piece one right after another under the feed dog, following your stitching guide, and making a chain of your pieces. When you're done, trim your threads. This way, all your pieces will be sewn at the same time and with the same seam allowances.
- With RIGHT sides of the fabric facing each other, pin your fabrics with the pin heads laying horizontal. Don't sew over our pins if you can help it. It bends them, and can also break your sewing machine needle.
- Now stitch the center back seams together and press the seams open with your iron. To save time, you can wait and press all your seams open at the same time.
- Now, follow suit by pinning your curved edges of your side-back/front-side piece to your back pieces. Start at the bottom and work your way to the top; easing the curves together.
- Now follow your seam allowance guide and sew these pieces together.
- Now, move on to the front piece (if you redrafted a princess seam in the front).
- Clip your curved seams and press open on both your fashion (outer) fabric and the lining.
- Now, matching the pieces with the right sides together, start at the bottom front and stitch up the front facings, around the neckline, neck, and stop at the bottom of the front facing on the opposite side:
- Next, make a stitch line about two inches long along the bottom edge of the front piece. Remember the peplum will sit back a bit from the point, so you want to finish this small area by stitching it, then turning. However, where the LARGE DOT is located, leave a small space open. This is where you will insert your boning for your lacing bars.
- Clip your curved seams, turn right side out and press with your steam iron.
- Now, mark your boning channel with your pencil on the inside of your lining. I take a piece of boning and draw a line the same width, then make it just a little bit bigger to allow room for the boning to slip easily into the channel once it is created.
- Now, starting at the bottom, make a tack with your backstitch, then follow the traced stitch line you drew inside the lining. Staystitch it at the top as well with a tack, making a back stitch
- Now, measure the length of your synthetic whale bone, cable ties, or a light weight metal stay.
- If using plastic, cut your length with wire cutters or heavy duty scissors. Make your top slanted a bit to better fit in the slanted shape of the bone channel.
- Wrap the ends in a small piece of duct tape to smooth out your sharp corners.
- Now, slide the stay from the bottom until it meets the top.
- Close the "hole" where you inserted the casing with a needle and thread. Take very SMALL, neat stitches so that it is not visible.
Now we will sew the peplum pieces together and then attach it to the waist of the bodice, and hand stitch the lining closed.
Step Five
Next, we will sew our sleeve pieces together and line them, then install them into the armholes.
Step Six:
Grommets Installation & Couching them with embroidery thread.
Step Seven:
Stomacher.
PART FIVE:
The next thing I wanted to include is the skirt or petticoat.
The Simplicity pattern calls for only three panels, but for a fuller more accurately pleated skirt you need 4 to 5 panels.
Another addition I like to make are facings to the pocket holes so that there isn't a gap that shows your smock underneath. The pattern just calls for "slits". The instructions in the pattern that Simplicity wrote are just not what I find to an optimum technique. My technique may not be historically accurate, but it is a much better alternative.


